
Page 888 - Deko-light Catalogue 2022
P. 888
STEP BY STEP GUIDE:
ATTACH ADDITIONAL END CAP TO 230V LED STRIPE
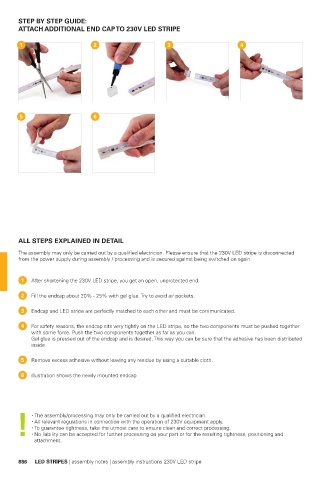
1 2 3 4
5 6
ALL STEPS EXPLAINED IN DETAIL
The assembly may only be carried out by a qualified electrician. Please ensure that the 230V LED stripe is disconnected
from the power supply during assembly / processing and is secured against being switched on again.
1 After shortening the 230V LED stripe, you get an open, unprotected end.
2 Fill the endcap about 20% - 25% with gel glue. Try to avoid air pockets.
3 Endcap and LED stripe are perfectly matched to each other and must be communicated.
4 For safety reasons, the endcap sits very tightly on the LED stripe, so the two components must be pushed together
with some force. Push the two components together as far as you can.
Gel glue is pressed out of the endcap and is desired. This way you can be sure that the adhesive has been distributed
inside.
5 Remove excess adhesive without leaving any residue by using a suitable cloth.
6 illustration shows the newly mounted endcap
The assembly/processing may only be carried out by a qualified electrician.
All relevant regulations in connection with the operation of 230V equipment apply.
To guarantee tightness, take the utmost care to ensure clean and correct processing.
No liability can be accepted for further processing on your part or for the resulting tightness, positioning and
attachment.
886 LED STRIPES | assembly notes | assembly instructions 230V LED stripe