
Page 42 - The World of Cross Stitching (February 2020)
P. 42
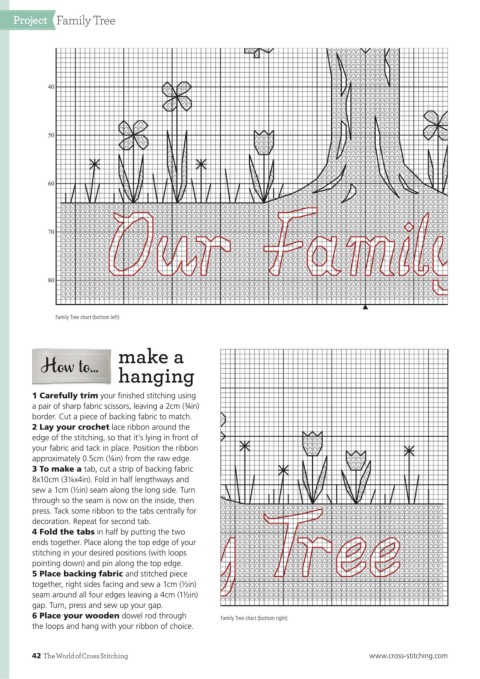
Project Family Tree


                 40


                 50


                 60


                 70


                 80


                    Family Tree chart (bottom left)


                                         make a
               How to...

                                         hanging


            1 Carefully trim your finished stitching using
            a pair of sharp fabric scissors, leaving a 2cm (¾in)
            border. Cut a piece of backing fabric to match.

            2 Lay your crochet lace ribbon around the
            edge of the stitching, so that it’s lying in front of
            your fabric and tack in place. Position the ribbon
            approximately 0.5cm (¼in) from the raw edge.
            3 To make a tab, cut a strip of backing fabric

            8x10cm (3¼x4in). Fold in half lengthways and
            sew a 1cm (½in) seam along the long side. Turn
            through so the seam is now on the inside, then
            press. Tack some ribbon to the tabs centrally for

            decoration. Repeat for second tab.
            4 Fold the tabs in half by putting the two
            ends together. Place along the top edge of your
            stitching in your desired positions (with loops
            pointing down) and pin along the top edge.
            5 Place backing fabric and stitched piece

            together, right sides facing and sew a 1cm (½in)
            seam around all four edges leaving a 4cm (1½in)
            gap. Turn, press and sew up your gap.
            6 Place your wooden dowel rod through                           Family Tree chart (bottom right)

            the loops and hang with your ribbon of choice.


            42  The World of Cross Stitching                                                                                  www.cross-stitching.com