
Page 231 - sarah-simblet_sketch-book-for-the-artist
P. 231
231
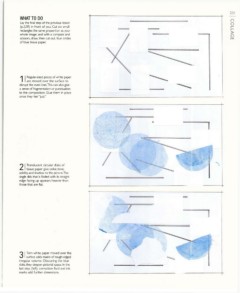
WHAT TO DO COLLAGE
Lay the final step of the previous lesson
(p.228) in front of you. Cut six small
rectangles the same proportion as your
whole image, and with a compass and
scissors, draw, then cut out, four circles
of blue tissue paper.
1Regular-sized pieces of white paper
are moved over the surface to
disrupt the even lines. This can also give
a sense of fragmentation or punctuation
to the composition. Glue them in place
once they feel "just"
2 Translucent circular disks of
tissue paper give color tone,
solidity, and shadow to thepicture.The
single disk that is folded with its straight
edge facing up appears heavier than
those that are flat.
3 Torn white paper moved over the
surface adds masks of rough-edged
irregular volume. Obscuring the blue
disks, they deepen pictorial space. In the
last step (left), correction fluid and ink
marks add further dimensions.