
Page 117 - REPOWER REFERENCE GUIDE (2020)
P. 117
Cooling System
3. Completely submerge the thermostat in water.
4. Heat the water.
5. Stir the water constantly to avoid direct heat being applied to the thermostat.
6. See specifications:
a. Check the thermostat initial opening temperature.
b. Check the thermostat full opening temperature.
c. Check valve lift at fully open position.
a
b
d d
c
24421
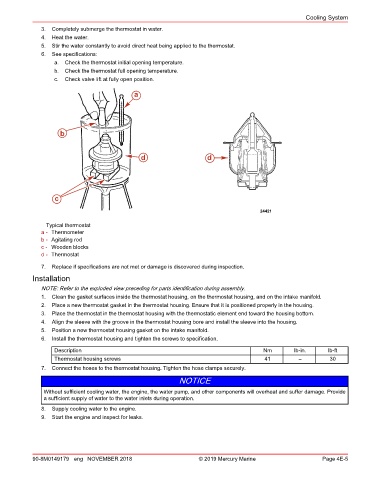
Typical thermostat
a - Thermometer
b - Agitating rod
c - Wooden blocks
d - Thermostat
7. Replace if specifications are not met or damage is discovered during inspection.
Installation
NOTE: Refer to the exploded view preceding for parts identification during assembly.
1. Clean the gasket surfaces inside the thermostat housing, on the thermostat housing, and on the intake manifold.
2. Place a new thermostat gasket in the thermostat housing. Ensure that it is positioned properly in the housing.
3. Place the thermostat in the thermostat housing with the thermostatic element end toward the housing bottom.
4. Align the sleeve with the groove in the thermostat housing bore and install the sleeve into the housing.
5. Position a new thermostat housing gasket on the intake manifold.
6. Install the thermostat housing and tighten the screws to specification.
Description Nm lb‑in. lb‑ft
Thermostat housing screws 41 – 30
7. Connect the hoses to the thermostat housing. Tighten the hose clamps securely.
NOTICE
Without sufficient cooling water, the engine, the water pump, and other components will overheat and suffer damage. Provide
a sufficient supply of water to the water inlets during operation.
8. Supply cooling water to the engine.
9. Start the engine and inspect for leaks.
90-8M0149179 eng NOVEMBER 2018 © 2019 Mercury Marine Page 4E-5