
Page 262 - REPOWER REFERENCE GUIDE (2020)
P. 262
8.1L/496/8.2L Triple Catalyst
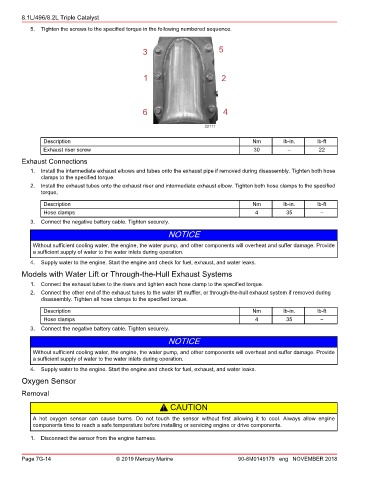
5. Tighten the screws to the specified torque in the following numbered sequence.
3 5
1 2
6 4
32111
Description Nm lb‑in. lb‑ft
Exhaust riser screw 30 – 22
Exhaust Connections
1. Install the intermediate exhaust elbows and tubes onto the exhaust pipe if removed during disassembly. Tighten both hose
clamps to the specified torque.
2. Install the exhaust tubes onto the exhaust riser and intermediate exhaust elbow. Tighten both hose clamps to the specified
torque.
Description Nm lb‑in. lb‑ft
Hose clamps 4 35 –
3. Connect the negative battery cable. Tighten securely.
NOTICE
Without sufficient cooling water, the engine, the water pump, and other components will overheat and suffer damage. Provide
a sufficient supply of water to the water inlets during operation.
4. Supply water to the engine. Start the engine and check for fuel, exhaust, and water leaks.
Models with Water Lift or Through‑the‑Hull Exhaust Systems
1. Connect the exhaust tubes to the risers and tighten each hose clamp to the specified torque.
2. Connect the other end of the exhaust tubes to the water lift muffler, or through‑the‑hull exhaust system if removed during
disassembly. Tighten all hose clamps to the specified torque.
Description Nm lb‑in. lb‑ft
Hose clamps 4 35 –
3. Connect the negative battery cable. Tighten securely.
NOTICE
Without sufficient cooling water, the engine, the water pump, and other components will overheat and suffer damage. Provide
a sufficient supply of water to the water inlets during operation.
4. Supply water to the engine. Start the engine and check for fuel, exhaust, and water leaks.
Oxygen Sensor
Removal
! CAUTION
A hot oxygen sensor can cause burns. Do not touch the sensor without first allowing it to cool. Always allow engine
components time to reach a safe temperature before installing or servicing engine or drive components.
1. Disconnect the sensor from the engine harness.
Page 7G-14 © 2019 Mercury Marine 90-8M0149179 eng NOVEMBER 2018