
Page 59 - Antelco Metric Catalogue 310320_FINAL.cdr
P. 59
Dripper Installation Guidelines
Installation Guidelines - Home Garden Drippers
®
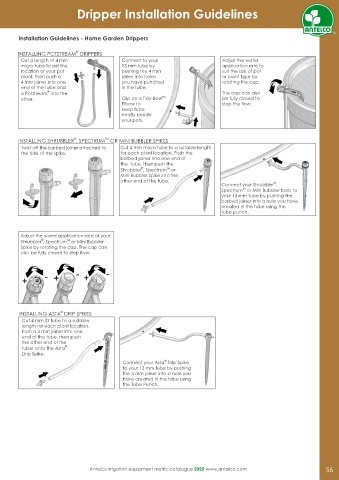
INSTALLING POTSTREAM DRIPPERS
Cut a length of 4 mm Connect to your Adjust the water
micro tube to suit the 13 mm tube by application rate to
location of your pot pushing the 4 mm suit the size of pot
plant, then push a joiner into holes or plant type by
4 mm joiner into one you have punched rotating the cap.
end of the tube and in the tube.
®
a Potstream into the The cap can also
TM
other. Clip on a Tidy-Bow be fully closed to
Elbow to stop the ow.
keep tube
neatly beside
your pots.
TM
®
INSTALLING SHRUBBLER , SPECTRUM OR MINI BUBBLER SPIKES
Twist off the barbed joiner attached to Cut 4 mm micro tube to a suitable length
the side of the spike. for each plant location. Push the
barbed joiner into one end of
the tube, then push the
® TM
Shrubbler , Spectrum or
Mini Bubbler Spike into the
other end of the tube.
®
Connect your Shrubbler ,
TM
Spectrum or Mini Bubbler barb to
your 13 mm tube by pushing the
barbed joiner into a hole you have
created in the tube using the
tube punch.
Adjust the water application rate of your
® TM
Shrubbler , Spectrum or Mini Bubbler
Spike by rotating the cap. The cap can
also be fully closed to stop ow.
®
INSTALLING ASTA DRIP SPIKES
Cut 4 mm ID tube to a suitable
length for each plant location.
Push a 4 mm joiner into one
end of the tube, then push
the other end of the
®
tuber onto the Asta
Drip Spike.
®
Connect your Asta Drip Spike
to your 13 mm tube by pushing
the 4 mm joiner into a hole you
have created in the tube using
the Tube Punch.
Antelco irrigation equipment metric catalogue 2020 www.antelco.com 56