
Page 312 - Auhagen Gesamtkatalog 2021
P. 312
Modellbautipp | Modell construction tip
SCHRITT | STEP 5 SCHRITT | STEP 6
Das Maß der Kanalbreite zeichnet man mit einem schwarzen Folienstift auf die … Zuschneiden mit einer scharfen Schere gelingt über einem hellen Untergrund
Seefolie. Das Anzeichnen und … besser. Achten Sie bitte auf einen exakt geraden Schnitt!
Use a black overhead projector marker to mark the dimensions of the canal on … cutting out the shape is easier on top of a light background using a sharp
the sheet. Marking and … pair of scissors. Be sure to make precise, straight cuts!
SCHRITT | STEP 7 SCHRITT | STEP 8
Die Seefolie wird nur punktuell am Randbereich befestigt. Geben Sie einige Eine gleichmäßige Befestigung der Seefolie an den Kanalrändern wird mit
Tropfen Alleskleber Art. 53 514 auf eine geeignete Unterlage. Somit können Sie Beschweren durch Holzleisten erreicht.
den Kleber mit einem kleinen angespitzten Holzspatel gut dosieren. Er trocknet
transparent auf. Make sure that the lake sheet adheres evenly to the edges of the canal by
weighing it down with wooden blocks.
The lake sheet is only attached with dots of glue along the edges. Pour out a
few drops of universal adhesive No. 53 514 onto a suitable surface. Then use
a small, sharpened wooden spatula to apply the glue. It dries clear.
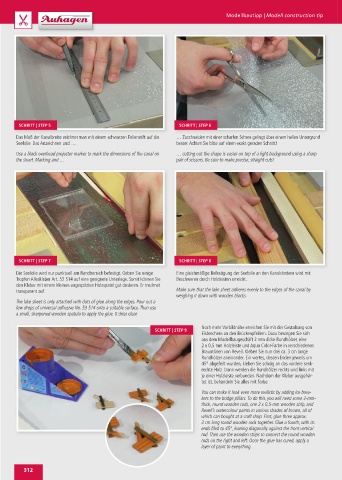
Noch mehr Vorbildnähe erreichen Sie mit der Gestaltung von
SCHRITT | STEP 9
Eisbrechern an den Brückenpfeilern. Dazu besorgen Sie sich
aus dem Modellbaugeschäft 2 mm dicke Rundhölzer, eine
2 x 0,5 mm Holzleiste und Aqua Color-Farbe in verschiedenen
Brauntönen von Revell. Kleben Sie nun drei ca. 3 cm lange
Rundhölzer aneinander. Ein viertes, dessen Enden jeweils um
45° abgefeilt wurden, kleben Sie schräg an das vordere senk-
rechte Holz. Dann werden die Rundhölzer rechts und links mit
je einer Holzleiste verbunden. Nachdem der Kleber ausgehär-
tet ist, behandeln Sie alles mit Farbe.
You can make it look even more realistic by adding ice brea‑
kers to the bridge pillars. To do this, you will need some 2‑mm‑
thick, round wooden rods, one 2 x 0,5‑mm wooden strip, and
Revell’s watercolour paints in various shades of brown, all of
which can bought at a craft shop. First, glue three approx.
3 cm long round wooden rods together. Glue a fourth, with its
ends filed to 45°, leaning diagonally against the front vertical
rod. Then use the wooden strips to connect the round wooden
rods on the right and left. Once the glue has cured, apply a
layer of paint to everything.
312