
Page 19 - QC-Smart_ PSS- Manual_webb ENG_Neat
P. 19
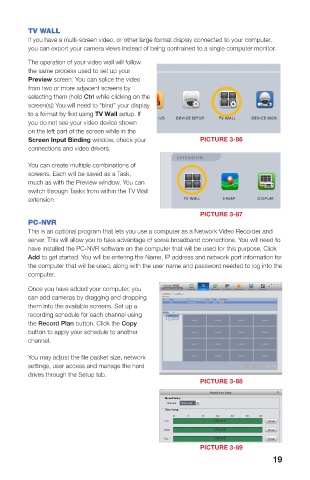
E-MAP  TV WALL
 When systems and cameras are connected from multiple locations, it can sometimes be   If you have a multi-screen video, or other large format display connected to your computer,
 difficult to keep track of where an event is occuring. Using the E-Map feature, you can import   you can export your camera views instead of being contrained to a single computer monitor.
 a graphic map in .BMP, .JPG or .PNG format and place icons representing your cameras in
 the appropriate location. Depending on where your cameras are located, the map can be the   The operation of your video wall will follow
 floorplan of your building, or of a much larger area.  the same process used to set up your
        Preview screen. You can splice the video
        from two or more adjacent screens by
        selecting them (hold Ctrl while clicking on the
        screen(s)) You will need to “bind” your display
        to a format by first using TV Wall setup. If
        you do not see your video device shown
        on the left part of the screen while in the
        Screen Input Binding window, check your     PICTURE 3-86
        connections and video drivers.

        You can create multiple combinations of
        screens. Each will be saved as a Task,
        much as with the Preview window. You can
        switch through Tasks from within the TV Wall
        extension.

                                                    PICTURE 3-87
        PC-NVR
        This is an optional program that lets you use a computer as a Network Video Recorder and
        server. This will allow you to take advantage of some broadband connections. You will need to
        have installed the PC-NVR software on the computer that will be used for this purpose. Click
        Add to get started. You will be entering the Name, IP address and network port information for
        the computer that will be used, along with the user name and password needed to log into the
        computer.
 PICTURE 3-84
        Once you have added your computer, you
 When you first select the E-Map icon, you will be asked to add a map. Once you have   can add cameras by dragging and dropping
 imported the file, it will appear in the window. Select Edit and then drag a camera from the   them into the available screens. Set up a
 device list on the right to its location on the map. While in Edit mode, you may modify or add   recording schedule for each channel using
 to the map using the options in the Tool pulldown to the right.  the Record Plan button. Click the Copy
 If you selected Flash in E-Map option when   button to apply your schedule to another
 creating your Alarm Scheme, the icon for a   channel.
 camera that is triggered will flash red to alert
 you. You can double click on either icon, or   You may adjust the file packet size, network
 the camera’s name in the device list to see   settings, user access and manage the hard
 its video.  drives through the Setup tab.
                                                    PICTURE 3-88


 PICTURE 3-85


                                                    PICTURE 3-89
 18                                                                    19