
Page 17 - QC-Smart_ PSS- Manual_webb ENG_Neat
P. 17
Account can also add and manage users with access to that recorder. If you are connected to an NVR,
Just as you can authorize others to use your system, you can also create user accounts for you may also add remote IP cameras to your system using the Remote Setting sub-menu.
others to use Smart PSS to observe and control any connected recorders. The process is Note that QC systems do not make use of the Serial Interface. The Auto Maintenance option
the same as on your DVR or NVR. And, you can grant users specific permissions or limit their is to allow the NVR or DVR to reset on a schedule for optimal performance.
ability to make changes as needed. System Info - Use the Log Information submenu to search and download activity logs from
STEP 1. Open the Account window and your system.
select Add from the upper left.
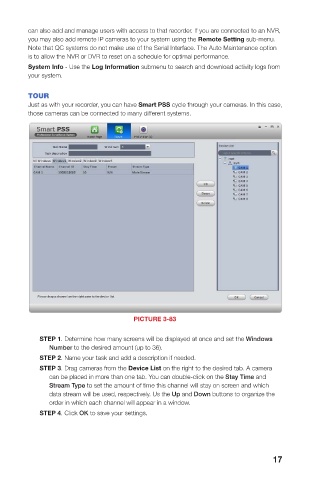
STEP 2. The Add User window will TOUR
open. Enter the new user’s name and Just as with your recorder, you can have Smart PSS cycle through your cameras. In this case,
password. You will also need to set those cameras can be connected to many different systems.
whether this user is a Manager or
Operator. Additionally, you may add
notes regarding this user.
STEP 3. Select which rights this user
is allowed from the User Authority
menu. You can also limit which
cameras and devices this user has
access to using the Device List on the
right of the window.
STEP 4. Click Add to save the new
account.
Select Add More to add additional users
without closing the window.
PICTURE 3-81
You can edit or remove a user account by
clicking on that user’s name in the Account
window and clicking on the Edit or Delete
button respectively.
Device Parameter Configuration
This button is located in the lower left of the PICTURE 3-82
Device Setup menu and opens up the Device Configuration window. This window contains PICTURE 3-83
menus granting access to more of your system’s functions . Detailed information on these
funtions is contained in respective parts of the User Manual. Included menus are: Network,
Event Manager, Storage Manager, System Configuration and System Info. Again, these STEP 1. Determine how many screens will be displayed at once and set the Windows
menus replicate those found on your recorder. Number to the desired amount (up to 36).
Network - The settings for your system’s connection to the network are located here. STEP 2. Name your task and add a description if needed.
Care should be given when altering these settings as changing them could result in loss of STEP 3. Drag cameras from the Device List on the right to the desired tab. A camera
connection to your recorder. can be placed in more than one tab. You can double-click on the Stay Time and
Stream Type to set the amount of time this channel will stay on screen and which
Event Manager - This contains the remaining settings that were not included in Video
Check, above. You can set responses for both the recorder itself and any other networked data stream will be used, respectively. Us the Up and Down buttons to organize the
systems. You are also able to configure the alarm responses for network conflicts, hard drive order in which each channel will appear in a window.
failure or full disk among others. STEP 4. Click OK to save your settings.
Storage Manager - This shows the status of your recorder’s hard drive(s).
System Config - Many of these are found in your Settings menu on your system, including
the general settings, such as the system language, date format, daylight savings time, etc. You
16 17