
Page 15 - QC-Smart_ PSS- Manual_webb ENG_Neat
P. 15
GENERAL Audio/Video
While most of the controls in Smart PSS are for operating your system remotely, the General This window contains three tabs which allow you to control the settings for the video streams,
Setting window is for controlling the program itself. There are two tabs in the General snapshot quality and quantity along with privacy masks and on-screen display.
settings window - General and File. The first tab, General, lets you perform some basic
housekeeping. Audio Video Stream - This tab allows you to make settings to optimize the video stream from
each camera. This is the same as found in the Camera Settings window of your system. You
Network - Adjust this slider to reflect your network speed. It ranges from “WAN” to “1000M” can adjust the quality, frame rate, coding and other aspects of both the Main Stream, which is
Log Save - This lets you set how long the activity logs are saved. Choose from 1 to 6 months. recorded onto the DVR and sent through the local network as well as the Substream, which is
Auto Login - When checked, Smart PSS will automatically log into your system when the used by mobile devices and Internet access.
program is launched. Pic Stream - You can set the quality and number of images taken when a snapshot is taken.
Auto Login Windows - If this is enabled and the computer restarts while Smart PSS is You can apply different settings depending on whether the image is captured manually, as a
running, then the computer will automatically log you back into Windows. result of motion detection or when triggered by an alarm.
Auto Time Sync - If needed, you can instruct Smart PSS to sync to the computer’s internal Video Cover - This tab lets you mask up to four areas of the video as well as toggling the
clock at a set time. display of the camera name, the date and the time.
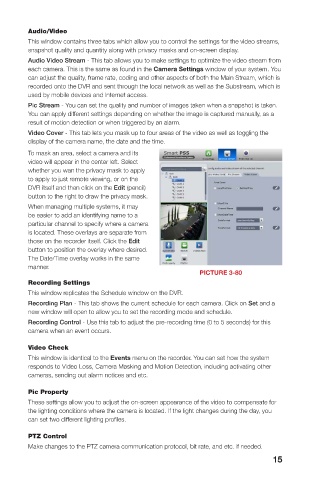
The File tab is where you set where recordings and snapshots will be saved on your To mask an area, select a camera and its
computer’s hard drive. video will appear in the center left. Select
whether you wan the privacy mask to apply
DEVICE SETUP to apply to just remote viewing, or on the
This window handles the functions found in the Alarm and Recording menus on your DVR itself and then click on the Edit (pencil)
system. Clicking on any of the five icons under the Device List on the left of the window will button to the right to draw the privacy mask.
open up the appropriate settings options. When managing multiple systems, it may
be easier to add an identifying name to a
particular channel to specify where a camera
is located. These overlays are separate from
those on the recorder itself. Click the Edit
button to position the overlay where desired.
The Date/Time overlay works in the same
manner.
PICTURE 3-80
Recording Settings
This window replicates the Schedule window on the DVR.
Recording Plan - This tab shows the current schedule for each camera. Click on Set and a
new window will open to allow you to set the recording mode and schedule.
Recording Control - Use this tab to adjust the pre-recording time (0 to 5 seconds) for this
camera when an event occurs.
Video Check
This window is identical to the Events menu on the recorder. You can set how the system
responds to Video Loss, Camera Masking and Motion Detection, including activating other
cameras, sending out alarm notices and etc.
Pic Property
These settings allow you to adjust the on-screen appearance of the video to compensate for
the lighting conditions where the camera is located. If the light changes during the day, you
PICTURE 3-79
can set two different lighting profiles.
When you have made a changes, click the OK button at the bottom right of the window to
save your new settings. You can also apply these settings to another camera by clicking on PTZ Control
the Use To... button and selecting the other camera. Make changes to the PTZ camera communication protocol, bit rate, and etc. if needed.
14 15