
Page 94 - 100% Biker (January 2020)
P. 94
SHED HEAD
Fig.4 Fig.5
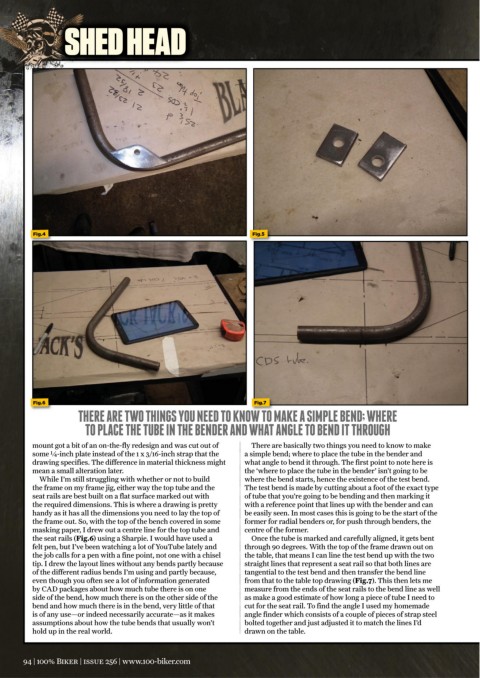
Fig.6 Fig.7
THERE ARE TWO THINGS YOU NEED TO KNOW TO MAKE A SIMPLE BEND; WHERE
TO PLACE THE TUBE IN THE BENDER AND WHAT ANGLE TO BEND IT THROUGH
mount got a bit of an on-the-fly redesign and was cut out of There are basically two things you need to know to make
some ¼-inch plate instead of the 1 x 3/16-inch strap that the a simple bend; where to place the tube in the bender and
drawing specifies. The difference in material thickness might what angle to bend it through. The first point to note here is
mean a small alteration later. the ‘where to place the tube in the bender’ isn’t going to be
While I’m still struggling with whether or not to build where the bend starts, hence the existence of the test bend.
the frame on my frame jig, either way the top tube and the The test bend is made by cutting about a foot of the exact type
seat rails are best built on a flat surface marked out with of tube that you’re going to be bending and then marking it
the required dimensions. This is where a drawing is pretty with a reference point that lines up with the bender and can
handy as it has all the dimensions you need to lay the top of be easily seen. In most cases this is going to be the start of the
the frame out. So, with the top of the bench covered in some former for radial benders or, for push through benders, the
masking paper, I drew out a centre line for the top tube and centre of the former.
the seat rails (Fig.6) using a Sharpie. I would have used a Once the tube is marked and carefully aligned, it gets bent
felt pen, but I’ve been watching a lot of YouTube lately and through 90 degrees. With the top of the frame drawn out on
the job calls for a pen with a fine point, not one with a chisel the table, that means I can line the test bend up with the two
tip. I drew the layout lines without any bends partly because straight lines that represent a seat rail so that both lines are
of the different radius bends I’m using and partly because, tangential to the test bend and then transfer the bend line
even though you often see a lot of information generated from that to the table top drawing (Fig.7). This then lets me
by CAD packages about how much tube there is on one measure from the ends of the seat rails to the bend line as well
side of the bend, how much there is on the other side of the as make a good estimate of how long a piece of tube I need to
bend and how much there is in the bend, very little of that cut for the seat rail. To find the angle I used my homemade
is of any use—or indeed necessarily accurate—as it makes angle finder which consists of a couple of pieces of strap steel
assumptions about how the tube bends that usually won’t bolted together and just adjusted it to match the lines I’d
hold up in the real world. drawn on the table.
94 | 100% Biker | issue 256 | www.100-biker.com