
Page 90 - Patchwork & Quilting - UK (February 2020)
P. 90
TECHNIQUE // in a nutshell
ENGLISH PAPER PIECINGŏ Foundation piecing
A traditional patchwork method where the fabric is folded and stitched dia. 9a dia. 9b
over accurately cut stiff paper shapes. The fabric is cut out with an 6 3 4
added seam allowanceband tacked, or glue basted with a glue pen, 1
over the paper. The fabric covered shapes are then placed right sides
together and overstitched with small neat stitches. On completion all 5 2 7
of thebtacking stitches and papers are removed. Hexagons and WS RS
diamonds are often stitched in this way.b
dia. 9c dia. 9d
FOUNDATION PIECING ŏ
This is a very accurate piecing technique where fabric patches are
stitched tobthe reverse of a foundation block. It is particularly useful
where sharp points are needed. Depending on the material used, the
foundation fabric/paper can be either left permanently in place (e.g. WS RS
lightweight cotton fabric or sew-in interfacing) or can be removed (e.g.
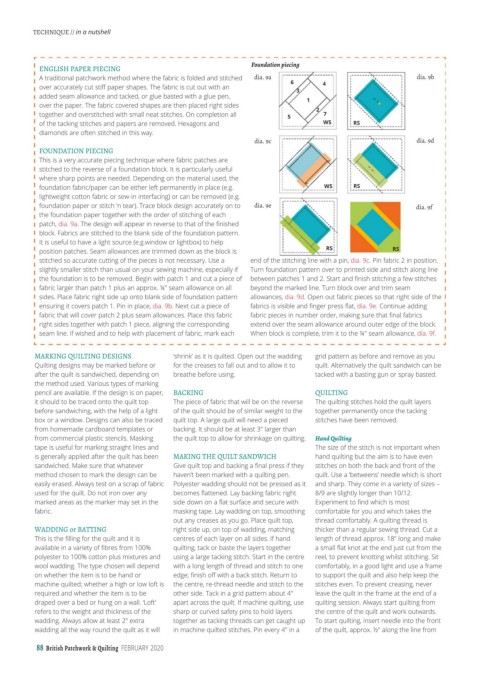
foundation paper or stitch ‘n tear).bTrace block design accurately on to dia. 9e dia. 9f
the foundation paper together with the order of stitching of each
patch,bdia. 9a. The design will appear in reverse to that of the finished
block. Fabrics are stitched to the blank side of the foundation pattern.
It is useful to have a light source (e.g.window or lightbox) to help
position patches. Seam allowances are trimmed down as the block is RS RS
stitched so accurate cutting of the pieces is not necessary. Use a end of the stitching line with a pin,bdia. 9c. Pin fabric 2 in position.
slightly smaller stitch than usual on your sewing machine, especially if Turn foundation pattern over to printed side and stitch along line
the foundation is to be removed. Begin with patch 1 and cut a piece of between patches 1 and 2. Start and finish stitching a few stitches
fabric larger than patch 1 plus an approx. ¼" seam allowance on all beyond the marked line. Turn block over and trim seam
sides. Place fabric right side up onto blank side of foundation pattern allowances,bdia. 9d. Open out fabric pieces so that right side of the
ensuring it covers patch 1. Pin in place,bdia. 9b. Next cut a piece of fabrics is visible and finger press flat,bdia. 9e. Continue adding
fabric that will cover patch 2 plus seam allowances. Place this fabric fabric pieces in number order, making sure that final fabrics
right sides together with patch 1 piece, aligning the corresponding extend over the seam allowance around outer edge of the block.
seam line. If wished and to help with placement of fabric, mark each When block is complete, trim it to the ¼" seam allowance,bdia. 9f.b
MARKING QUILTING DESIGNS ‘shrink’ as it is quilted. Open out the wadding grid pattern as before and remove as you
Quilting designs may be marked before or for the creases to fall out and to allow it to quilt. Alternatively the quilt sandwich can be
after the quilt is sandwiched, depending on breathe before using.b tacked with a basting gun or spray basted.b
the method used. Various types of marking
pencil are available. If the design is on paper, BACKINGŏ QUILTINGŏ
it should to be traced onto the quilt top The piece of fabric that will be on the reverse The quilting stitches hold the quilt layers
before sandwiching, with the help of a light of the quilt should be of similar weight to the together permanently once the tacking
box or a window. Designs can also be traced quilt top. A large quilt will need a pieced stitches have been removed.
from homemade cardboard templates or backing. It should be at least 3" larger than
from commercial plastic stencils. Masking the quilt top to allow for shrinkage on quilting.b Hand QuiltingĿ
tape is useful for marking straight lines and The size of the stitch is not important when
is generally applied after the quilt has been MAKING THE QUILT SANDWICHŏ hand quilting but the aim is to have even
sandwiched. Make sure that whatever Give quilt top and backing a final press if they stitches on both the back and front of the
method chosen to mark the design can be haven’t been marked with a quilting pen. quilt. Use a ‘betweens’ needle which is short
easily erased. Always test on a scrap of fabric Polyester wadding should not be pressed as it and sharp. They come in a variety of sizes –
used for the quilt. Do not iron over any becomes flattened. Lay backing fabric right 8/9 are slightly longer than 10/12.
marked areas as the marker may set in the side down on a flat surface and secure with Experiment to find which is most
fabric.b masking tape. Lay wadding on top, smoothing comfortable for you and which takes the
out any creases as you go. Place quilt top, thread comfortably. A quilting thread is
WADDING or BATTINGŏ right side up, on top of wadding, matching thicker than a regular sewing thread. Cut a
This is the filling for the quilt and it is centres of each layer on all sides.bIf hand length of thread approx. 18" long and make
available in a variety of fibres from 100% quilting, tack or baste the layers together a small flat knot at the end just cut from the
polyester to 100% cotton plus mixtures and using a large tacking stitch. Start in the centre reel, to prevent knotting whilst stitching. Sit
wool wadding. The type chosen will depend with a long length of thread and stitch to one comfortably, in a good light and use a frame
on whether the item is to be hand or edge; finish off with a back stitch. Return to to support the quilt and also help keep the
machine quilted; whether a high or low loft is the centre, re-thread needle and stitch to the stitches even. To prevent creasing, never
required and whether the item is to be other side. Tack in a grid pattern about 4" leave the quilt in the frame at the end of a
draped over a bed or hung on a wall. ‘Loft’ apart across the quilt. If machine quilting, use quilting session. Always start quilting from
refers to the weight and thickness of the sharp or curved safety pins to hold layers the centre of the quilt and work outwards.
wadding. Always allow at least 2" extra together as tacking threads can get caught up To start quilting, insert needle into the front
wadding all the way round the quilt as it will in machine quilted stitches. Pin every 4" in a of the quilt, approx. ½" along the line from
88 British Patchwork & Quilting FEBRUARY 2020