
Page 91 - Patchwork & Quilting - UK (February 2020)
P. 91
TECHNIQUE // in a nutshell
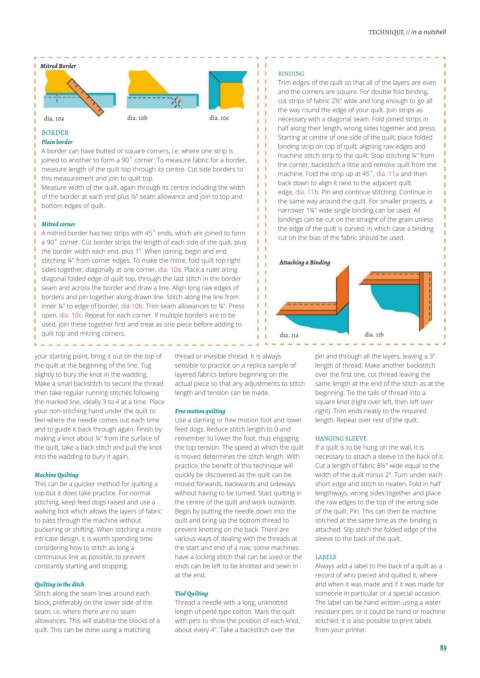
Mitred Border
BINDINGŏ
Trim edges of the quilt so that all of the layers are even
and the corners are square. For double fold binding,
cut strips of fabric 2½" wide and long enough to go all
the way round the edge of your quilt. Join strips as
dia. 10a dia. 10b dia. 10c necessary with a diagonal seam. Fold joined strips in
half along their length, wrong sides together and press.
BORDERŏ Starting at centre of one side of the quilt, place folded
Plain border binding strip on top of quilt, aligning raw edges and
A border can have butted or square corners, i.e.bwhere one strip is machine stitch strip to the quilt. Stop stitching ¼" from
joined to another to form a 90˚ corner. To measure fabric for a border,
measure length of the quilt top through its centre. Cut side borders to the corner, backstitch a little and remove quilt from the
machine. Fold the strip up at 45˚,bdia. 11aband then
this measurement and join to quilt top. back down to align it next to the adjacent quilt
Measure width of the quilt, again through its centre including the width
of the border at each end plus ½" seam allowance and join to top and edge,bdia. 11b. Pin and continue stitching. Continue in
the same way around the quilt. For smaller projects, a
bottom edges of quilt.
narrower 1¼" wide single binding can be used. All
bindings can be cut on the straight of the grain unless
Mitred corner the edge of the quilt is curved, in which case a binding
A mitred border has two strips with 45˚ ends, which are joined to form cut on the bias of the fabric should be used.b
a 90˚bcorner. Cut border strips the length of each side of the quilt, plus
the border width each end, plus 1". When joining, begin and end
stitching ¼" from corner edges. To make the mitre, fold quilt top right Attaching a Binding
sidesbtogether, diagonally at one corner, dia. 10a. Place a ruler along
diagonal folded edge of quilt top, through the last stitch in the border
seam and across the border and draw a line. Align long raw edges of
borders and pin together along drawn line. Stitch along the line from
inner ¼" to edge of border,bdia 10b. Trim seam allowances to ¼". Press
open, dia. 10c. Repeat for each corner. If multiple borders are to be
used, join these together first and treat as one piece before adding to
quilt top and mitring corners. dia. 11a dia. 11b
your starting point, bring it out on the top of thread or invisible thread. It is always pin and through all the layers, leaving a 3"
the quilt at the beginning of the line. Tug sensible to practice on a replica sample of length of thread. Make another backstitch
slightly to bury the knot in the wadding. layered fabrics before beginning on the over the first one, cut thread leaving the
Make a small backstitch to secure the thread actual piece so that any adjustments to stitch same length at the end of the stitch as at the
then take regular running stitches following length and tension can be made. beginning. Tie the tails of thread into a
the marked line, ideally 3 to 4 at a time. Place square knot (right over left, then left over
your non-stitching hand under the quilt to Free motion quilting right). Trim ends neatly to the required
feel where the needle comes out each time Use a darning or free motion foot and lower length. Repeat over rest of the quilt.b
and to guide it back through again. Finish by feed dogs. Reduce stitch length to 0 and
making a knot about ¼" from the surface of remember to lower the foot, thus engaging HANGING SLEEVEŏ
the quilt, take a back stitch and pull the knot the top tension. The speed at which the quilt If a quilt is to be hung on the wall, it is
into the wadding to bury it again. is moved determines the stitch length. With necessary to attach a sleeve to the back of it.
practice, the benefit of this technique will Cut a length of fabric 8½" wide equal to the
Machine QuiltingĿ quickly be discovered as the quilt can be width of the quilt minus 2". Turn under each
This can be a quicker method for quilting a moved forwards, backwards and sideways short edge and stitch to neaten. Fold in half
top but it does take practice.bFor normal without having to be turned. Start quilting in lengthways, wrong sides together and place
stitching, keep feed dogs raised and use a the centre of the quilt and work outwards. the raw edges to the top of the wrong side
walking foot which allows the layers of fabric Begin by putting the needle down into the of the quilt. Pin. This can then be machine
to pass through the machine without quilt and bring up the bottom thread to stitched at the same time as the binding is
puckering or shifting.bWhen stitching a more prevent knotting on the back. There are attached. Slip stitch the folded edge of the
intricate design, it is worth spending time various ways of dealing with the threads at sleeve to the back of the quilt.b
considering how to stitch as long a the start and end of a row; some machines
continuous line as possible, to prevent have a locking stitch that can be used or the LABELSŏ
constantly starting and stopping.b ends can be left to be knotted and sewn in Always add a label to the back of a quilt as a
at the end. record of who pieced and quilted it, where
Quilting in the ditchĿ and when it was made and if it was made for
Stitch along the seam lines around each Tied QuiltingĿ someone in particular or a special occasion.
block, preferably on the lower side of the Thread a needle with a long, unknotted The label can be hand written using a water
seam, i.e. where there are no seam length of perlé type cotton. Mark the quilt resistant pen, or it could be hand or machine
allowances. This will stabilise the blocks of a with pins to show the position of each knot, stitched. It is also possible to print labels
quilt. This can be done using a matching about every 4". Take a backstitch over the from your printer.
89