
Page 17 - Tamiya Model Magazine - Issue 292 (February 2020)
P. 17
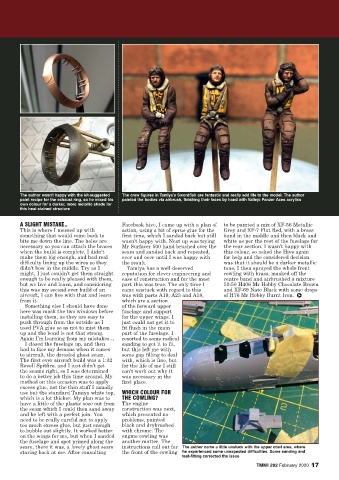
The author wasn't happy with the kit-suggested   The crew figures in Tamiya’s Swordfish are fantastic and really add life to the model. The author
        paint recipe for the exhaust ring, so he mixed his   painted the bodies via airbrush, finishing their faces by hand with Vallejo Panzer Aces acrylics
        own colour for a darker, more metallic shade for
        this heat-stained structure


        A SLIGHT MISTAKE..                  Facebook hive, I came up with a plan of   to be painted a mix of XF-56 Metallic
        This is where I messed up with      action, using a bit of sprue glue for the   Grey and XF-7 Flat Red, with a brass
        something that would come back to   first time, which I sanded back but still   band in the middle and then black and
        bite me down the line. The holes are   wasn’t happy with. Next up was trying   white as per the rest of the fuselage for
        necessary so you can attach the braces   Mr Surfacer 500 hand brushed over the   the rear section. I wasn’t happy with
        when the build is complete, I didn’t   seam and sanded back and repeated,   this colour, so asked the Hive again
        make them big enough, and had real   over and over until I was happy with   for help and the considered decision
        difficulty lining up the wires so they   the result.                    was that it should be a darker metallic
        didn’t bow in the middle. Try as I    Tamiya has a well-deserved        tone, I then sprayed the whole front
        might, I just couldn’t get them straight   reputation for clever engineering and   cowling with brass, masked off the
        enough to be really pleased with them,   ease of construction and for the most   centre band and airbrushed a mixture
        but we live and learn, and considering   part this was true. The only time I   50:50 H406 Mr Hobby Chocolate Brown
        this was my second ever build of an   came unstuck with regard to this   and XF-69 Nato Black with some drops
        aircraft, I can live with that and learn   was with parts A19, A23 and A18,   of H76 Mr Hobby Burnt Iron. U
        from it.                            which are a section
          Something else I should have done   of the forward upper
        here was mask the two windows before   fuselage and support
        installing them, as they are easy to   for the upper wings. I
        push through from the outside as I   just could not get it to
        used PVA glue so as not to mist them   fit flush in the main
        up and the bond is not that strong.   part of the fuselage. I
        Again I’m learning from my mistakes…  resorted to some radical
          I closed the fuselage up, and then   sanding to get it to fit,
        had to face my demons when it comes   but this left me with
        to aircraft, the dreaded ghost seam.   some gap filling to deal
        The first ever aircraft build was a 1:32   with, which is fine, but
        Revell Spitfire, and I just didn’t get   for the life of me I still
        the seams right, so I was determined   can't work out why it
        to do a better job this time around. My   was necessary in the
        method on this occasion was to apply   first place.
        excess glue, not the thin stuff I usually
        use but the standard Tamiya white top,  WHICH COLOUR FOR
        which is a lot thicker. My plan was to   THE COWLING?
        have a little of the plastic ooze out from   The engine
        the seam which I could then sand away   construction was next,
        and be left with a perfect join. You   which presented no
        need to be really careful not to apply   problems, painted
        too much excess glue, but just enough   black and drybrushed
        to bubble out slightly. It worked better   with chrome. The
        on the wings for me, but when I sanded   engine cowling was
        the fuselage and spot primed along the   another matter. The
        seam, there it was, a lovely ghost seam   instructions call out for  The author came a little unstuck with the upper cowl area, where
        staring back at me. After consulting   the front of the cowling  he experienced some unexpected difficulties. Some sanding and
                                                                 test-fitting corrected the issue
                                                                                           TMMI 292 February 2020  17