
Page 19 - Tamiya Model Magazine - Issue 292 (February 2020)
P. 19
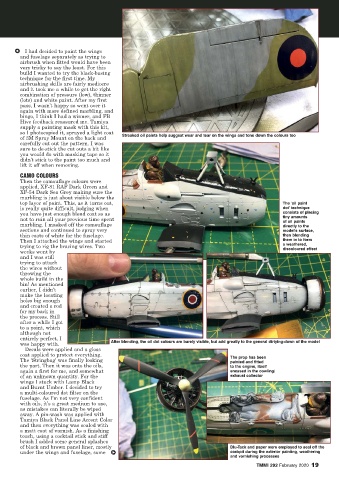
V   I had decided to paint the wings
        and fuselage separately as trying to
        airbrush when fitted would have been
        very tricky to say the least. For this
        build I wanted to try the black-basing
        technique for the first time. My
        airbrushing skills are fairly mediocre
        and it took me a while to get the right
        combination of pressure (low), thinner
        (lots) and white paint. After my first
        pass, I wasn’t happy so went over it
        again with more defined marbling, and
        bingo, I think I had a winner, and FB
        Hive feedback reassured me. Tamiya
        supply a painting mask with this kit,
        so I photocopied it, sprayed a light coat   Streaked oil paints help suggest wear and tear on the wings and tone down the colours too
        of 3M Spray Mount on the back and
        carefully cut out the pattern. I was
        sure to de-stick the cut outs a bit like
        you would do with masking tape so it
        didn’t stick to the paint too much and
        lift it off when removing.
        CAMO COLOURS
        Then the camouflage colours were
        applied, XF-81 RAF Dark Green and
        XF-54 Dark Sea Grey making sure the
        marbling is just about visible below the
        top layer of paint. This, as it turns out,                                                  The 'oil paint
        is really quite difficult, judging when                                                     dot' technique
        you have just enough blend coat so as                                                       consists of placing
                                                                                                    tiny amounts
        not to ruin all your previous time spent                                                    of oil paints
        marbling. I masked off the camouflage                                                       directly to the
        sections and continued to spray very                                                        model's surface,
        thin coats of white for the fuselage.                                                       then blending
        Then I attached the wings and started                                                       them in to form
        trying to rig the bracing wires. Two                                                        a weathered,
                                                                                                    discoloured effect
        weeks went by
        and I was still
        trying to attach
        the wires without
        throwing the
        whole build in the
        bin! As mentioned
        earlier, I didn’t
        make the locating
        holes big enough
        and created a rod
        for my back in
        the process. Still
        after a while I got
        to a point, which
        although not
        entirely perfect, I             After blending, the oil dot colours are barely visible, but add greatly to the general dirtying-down of the model
        was happy with.
          Decals were applied and a gloss
        coat applied to protect everything.                                       The prop has been
        The ‘Stringbag’ was finally looking                                       painted and fitted
        the part. Then it was onto the oils,                                      to the engine, itself
        again a first for me, and somewhat                                        encased in the cowling/
        of an unknown quantity. For the                                           exhaust collector
        wings I stuck with Lamp Black
        and Burnt Umber. I decided to try
        a multi-coloured dot filter on the
        fuselage. As I’m not very confident
        with oils, it’s a great medium to use,
        as mistakes can literally be wiped
        away. A pin-wash was applied with
        Tamiya Black Panel Line Accent Color
        and then everything was sealed with
        a matt coat of varnish. As a finishing
        touch, using a cocktail stick and stiff
        brush I added some general splashes
        of black and brown panel liner, mostly                                    Blu-Tack and paper were employed to seal off the
        under the wings and fuselage, some   U                                    cockpit during the exterior painting, weathering
                                                                                  and varnishing processes
                                                                                           TMMI 292 February 2020  19