
Page 346 - The City and Guilds Textbook: Plumbing Book 1 for the Level 3 Apprenticeship (9189), Level 2 Technical Certificate (8202) and Level 2 Diploma (6035)
P. 346
The City & Guilds Textbook: Plumbing Book 1
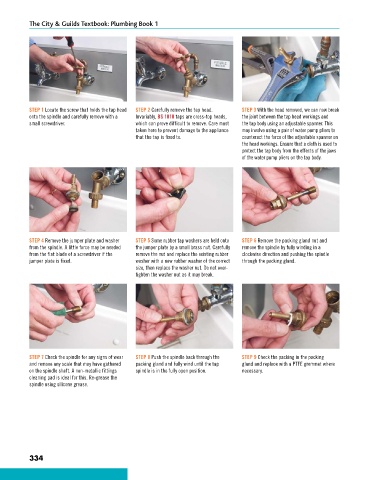
STEP 1 Locate the screw that holds the tap head STEP 2 Carefully remove the tap head. STEP 3 With the head removed, we can now break
onto the spindle and carefully remove with a Invariably, BS 1010 taps are cross-top heads, the joint between the tap head workings and
small screwdriver. which can prove difficult to remove. Care must the tap body using an adjustable spanner. This
taken here to prevent damage to the appliance may involve using a pair of water pump pliers to
that the tap is fixed to. counteract the force of the adjustable spanner on
the head workings. Ensure that a cloth is used to
protect the tap body from the effects of the jaws
of the water pump pliers on the tap body.
STEP 4 Remove the jumper plate and washer STEP 5 Some rubber tap washers are held onto STEP 6 Remove the packing gland nut and
from the spindle. A little force may be needed the jumper plate by a small brass nut. Carefully remove the spindle by fully winding in a
from the flat blade of a screwdriver if the remove the nut and replace the existing rubber clockwise direction and pushing the spindle
jumper plate is fixed. washer with a new rubber washer of the correct through the packing gland.
size, then replace the washer nut. Do not over-
tighten the washer nut as it may break.
STEP 7 Check the spindle for any signs of wear STEP 8 Push the spindle back through the STEP 9 Check the packing in the packing
and remove any scale that may have gathered packing gland and fully wind until the tap gland and replace with a PTFE grommet where
on the spindle shaft. A non-metallic fittings spindle is in the fully open position. necessary.
cleaning pad is ideal for this. Re-grease the
spindle using silicone grease.
334
9781510416482.indb 334 29/03/19 9:00 PM