
Page 349 - The City and Guilds Textbook: Plumbing Book 1 for the Level 3 Apprenticeship (9189), Level 2 Technical Certificate (8202) and Level 2 Diploma (6035)
P. 349
Chapter 5 Cold water systems
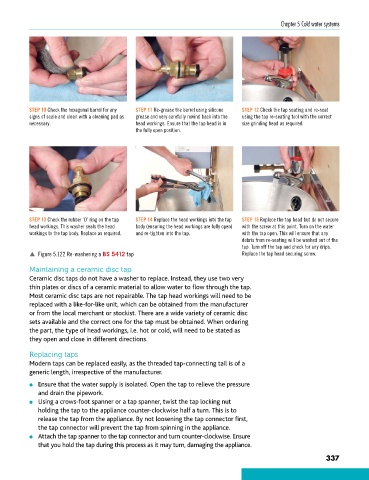
STEP 10 Check the hexagonal barrel for any STEP 11 Re-grease the barrel using silicone STEP 12 Check the tap seating and re-seat
signs of scale and clean with a cleaning pad as grease and very carefully rewind back into the using the tap re-seating tool with the correct
necessary. head workings. Ensure that the tap head is in size grinding head as required.
the fully open position.
STEP 13 Check the rubber ‘O’ ring on the tap STEP 14 Replace the head workings into the tap STEP 15 Replace the tap head but do not secure
head workings. This washer seals the head body (ensuring the head workings are fully open) with the screw at this point. Turn on the water
workings to the tap body. Replace as required. and re-tighten into the tap. with the tap open. This will ensure that any
debris from re-seating will be washed out of the
tap. Turn off the tap and check for any drips.
p Figure 5.122 Re-washering a BS 5412 tap Replace the tap head securing screw.
Maintaining a ceramic disc tap
Ceramic disc taps do not have a washer to replace. Instead, they use two very
thin plates or discs of a ceramic material to allow water to flow through the tap.
Most ceramic disc taps are not repairable. The tap head workings will need to be
replaced with a like-for-like unit, which can be obtained from the manufacturer
or from the local merchant or stockist. There are a wide variety of ceramic disc
sets available and the correct one for the tap must be obtained. When ordering
the part, the type of head workings, i.e. hot or cold, will need to be stated as
they open and close in different directions.
Replacing taps
Modern taps can be replaced easily, as the threaded tap-connecting tail is of a
generic length, irrespective of the manufacturer.
● Ensure that the water supply is isolated. Open the tap to relieve the pressure
and drain the pipework.
● Using a crows-foot spanner or a tap spanner, twist the tap locking nut
holding the tap to the appliance counter-clockwise half a turn. This is to
release the tap from the appliance. By not loosening the tap connector first,
the tap connector will prevent the tap from spinning in the appliance.
● Attach the tap spanner to the tap connector and turn counter-clockwise. Ensure
that you hold the tap during this process as it may turn, damaging the appliance.
337
9781510416482.indb 337 29/03/19 9:01 PM