
Page 105 - sarah-simblet_sketch-book-for-the-artist
P. 105
105
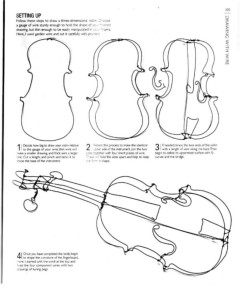
SETTING UP DRAWING WITH WIRE
Follow these steps to draw a three-dimensional violin Choose
a gauge of wire sturdy enough to hold the shape ofyourfinished
drawing, but thin enough to be easily manipulated inyourfingers
Here. I used garden wire and cut it carefully with pruners.
1Decide how big to draw your violin relative 2 Repeat this process to make the identical 3 If needed, brace the two ends of the violin
to the gauge of your wire; thin wire will upper side of the instrument. Join the two with a length of wire along the back. Then
make a smaller drawing, and thick wire a larger sides together with four short pieces of wire. begin to define its uppermost surface with S-
one. Cut a length, and pinch and bend it to These will hold the sides apart and help to keep curves and the bridge.
shape the base of the instrument
the form in shape.
4 Once you have completed the body, begin
to shape the curvature of the fingerboard.
Here, I started with the scroll at the top and
fixed the four component wires with two
drawings of tuning pegs.