
Page 22 - sarah-simblet_sketch-book-for-the-artist
P. 22
INTRODUCTION22
Posture and Grip
T o DRAW WELL, your whole relaxed b o d y should be correct side: if right-handed, place it on your right, a n d
involved. In this book we will look at parallels between look to the left of it at your subject; if left-handed, place
drawing and music. There are also parallels to dance. You it on your left, and look to the right. There should be an
do not have to dance to draw, but you need to understand open, flowing space between your hand, body, and subject.
that the expression of a line or mark originates in the body Placing your easel on the wrong side folds your body
and flows through the shoulder, arm, and hand to the against your drawing arm. If seated on a b e n c h easel (a
fingertips. If your body posture is well balanced and you donkey), or with your drawing board angled between your
can move freely, your drawing will reflect this. It will also lap and a chair, don't sit too close to the paper. If your hand
reflect discomfort if you are in any way cramped. twists to maneuver between the paper and your body, your
lines will distort. Accelerated perspective also occurs if you
How you hold your drawing materials is also important. look down the surface steeply (see pp. 116-17). Ideally, you
Examples are shown here, but it should not be forgotten should be able to look
that many people make remarkable and striking works comfortably straight ahead
drawing with their feet or holding their brush or pencil at your picture plane.
in their mouths. If using an upright easel, place it on the
SPACE TO WORK
Drawing classes can be cramped
places, but wherever possible,
make sure you have enough room
to back away and view your work.
Regularly step back 6-9 ft (2-3 m)
to check your progress. From a
distance you will spot errors you
cannot see close up. Turning your
drawing sideways or upside-own
will also help reveal what is wrong.
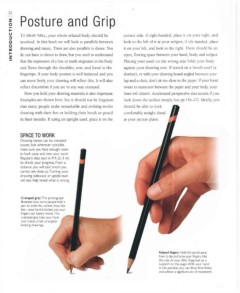
Cramped grip.This photograph
illustrates how some people hold a
pen to write. You cannot draw like
this—your hand is locked and your
fingers can barely move. This
cramped grip tires your hand
and makes small, strangled-
looking drawings.
Relaxed fingers: Hold the pencil away
from its tip and relax your fingers. Use
the side of your little fingernail as a
support on the page. With your hand
in this position, you can draw lines freely
and achieve a significant arc of movement.