
Page 58 - sarah-simblet_sketch-book-for-the-artist
P. 58
PLANTS AND GARDENS58
Negative Space
UNCONSCIOUSLY WE ASSESS spatial relationships all the time positive shape right; a foundation stone in picture-making.
to guide ourselves through the world. But how often do we Unfamiliar shapes of negative space reveal the real shape of
look at the air between things; shapes of air cut out and a positive subject. Looking at negative space overrides the
defined by the physicality of our environment? When we problem of drawing what you know, rather than what you
look into the branches of a tree, do we see myriad distinct see in front of you. It is an astonishingly simple device
and unique shapes of daylight or do we just see branches? that many artists use and I strongly recommend.
Why as artists should we look at the air?
The drawing opposite is of the uppermost leaves of
Every space in a picture has a shape, position, tone, and a potted fig tree. In following this class, you will need a
a role to play. Viewers appreciating a finished image may similar large-leaved plant, a sharp H B pencil, an eraser,
not see shapes of space, but if the artist does, their subject and a fresh page in your drawing book. Remember that
and composition will become more real, unified, dynamic, plants do move! Therefore it is best to complete your
and engaging. Negative space is the simple key to getting drawing in one sitting if possible.
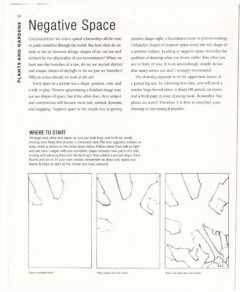
WHERE TO START
Arrange your plant and paper so you can look back and forth by barely
moving your head; this ensures a consistent view.The box opposite isolates an
area, which is shown in the three steps below. Follow these from left to right
and see how I began with one complete shape between two parts of a leaf,
erasing and adjusting lines until itlooked right, then added a second shape, third,
fourth, and so on. In your own version, remember to draw only space, not
leaves. It helps to start at the center and map outward.
Draw a complete shape Map outward from the center Erase and adjust lines until correct