
Page 108 - Learn To Program With Scratch
P. 108
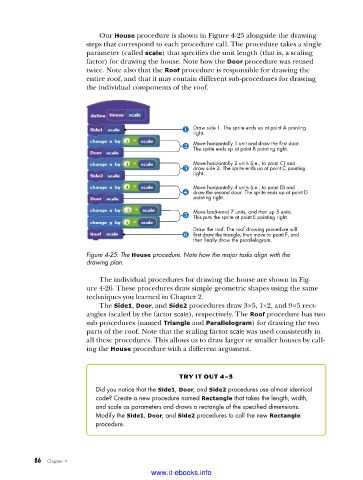
Our House procedure is shown in Figure 4-25 alongside the drawing
steps that correspond to each procedure call. The procedure takes a single
parameter (called scale) that specifies the unit length (that is, a scaling
factor) for drawing the house. Note how the Door procedure was reused
twice. Note also that the Roof procedure is responsible for drawing the
entire roof, and that it may contain different sub-procedures for drawing
the individual components of the roof.
Draw side 1. The sprite ends up at point A pointing
right.
Move horizontally 1 unit and draw the first door.
The sprite ends up at point B pointing right.
Move horizontally 2 units (i.e., to point C) and
draw side 2. The sprite ends up at point C pointing
right.
Move horizontally 4 units (i.e., to point D) and
draw the second door. The sprite ends up at point D
pointing right.
Move backward 7 units, and then up 5 units.
This puts the sprite at point E pointing right.
Draw the roof. The roof drawing procedure will
first draw the triangle, then move to point F, and
then finally draw the parallelogram.
Figure 4-25: The House procedure . Note how the major tasks align with the
drawing plan .
The individual procedures for drawing the house are shown in Fig-
ure 4-26. These procedures draw simple geometric shapes using the same
techniques you learned in Chapter 2.
The Side1, Door, and Side2 procedures draw 3×5, 1×2, and 9×5 rect-
angles (scaled by the factor scale), respectively. The Roof procedure has two
sub-procedures (named Triangle and Parallelogram) for drawing the two
parts of the roof. Note that the scaling factor scale was used consistently in
all these procedures. This allows us to draw larger or smaller houses by call-
ing the House procedure with a different argument.
try it out 4-3
Did you notice that the Side1, Door, and Side2 procedures use almost identical
code? Create a new procedure named Rectangle that takes the length, width,
and scale as parameters and draws a rectangle of the specified dimensions .
Modify the Side1, Door, and Side2 procedures to call the new Rectangle
procedure .
86 Chapter 4
www.it-ebooks.info