Page 54 - Making Cards & Papercraft (February 2020)
P. 54

DIP DYE


                              How to achieve a


           By Jeni Machon dip dye eff e


             Designed by


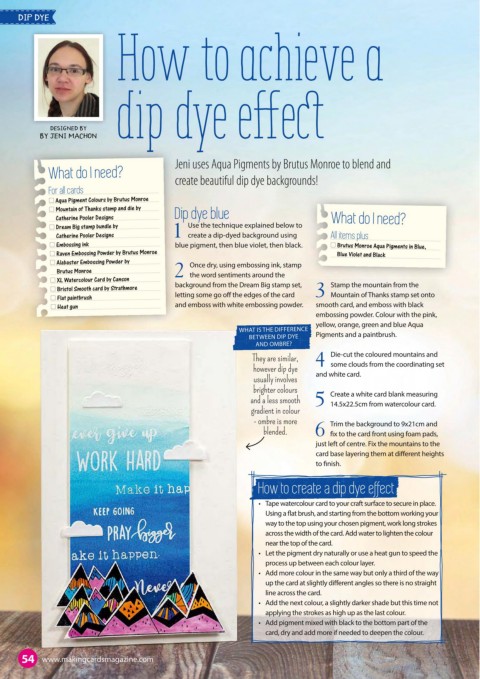
                                            Jeni uses Aqua Pigments by Brutus Monroe to blend and
             What do I need?
                                            create beautiful dip dye backgrounds!
             For all cards
               Aqua Pigment Colours by Brutus Monroe
               Mountain of Thanks stamp and die by
               Catherine Pooler Designs     Dip dye blue                           What do I need?
               Dream Big stamp bundle by        Use the technique explained below to
               Catherine Pooler Designs     1 create a dip-dyed background using   All items plus
               Embossing ink                blue pigment, then blue violet, then black.    Brutus Monroe Aqua Pigments in Blue,
                Raven Embossing Powder by Brutus Monroe                              Blue Violet and Black
                Alabaster Embossing Powder by   Once dry, using embossing ink, stamp
               Brutus Monroe                2 the word sentiments around the
                XL Watercolour Card by Canson
                Bristol Smooth card by Strathmore  background from the Dream Big stamp set,   Stamp the mountain from the

                Flat paintbrush             letting some go o  the edges of the card  3 Mountain of Thanks stamp set onto
                Heat gun                    and emboss with white embossing powder.  smooth card, and emboss with black
                                                                               embossing powder. Colour with the pink,
                                                                               yellow, orange, green and blue Aqua
                                                            WHAT IS THE DIFFERENCE
                                                               BETWEEN DIP DYE  Pigments and a paintbrush.
                                                                AND OMBRE?
                                                                They are similar,   Die-cut the coloured mountains and
                                                                however dip dye   4 some clouds from the coordinating set
                                                                usually involves   and white card.
                                                                brighter colours
                                                                                   Create a white card blank measuring
                                                               and a less smooth   5 14.5x22.5cm from watercolour card.
                                                               gradient in colour
                                                                - ombre is more    Trim the background to 9x21cm and
                                                                  blended.     6   x to the card front using foam pads,
                                                                               just left of centre. Fix the mountains to the
                                                                               card base layering them at di erent heights

                                                                               to  nish.

                                                                 How to create a dip dye effect

                                                                 •   Tape watercolour card to your craft surface to secure in place.

                                                                   Using a  at brush, and starting from the bottom working your
                                                                   way to the top using your chosen pigment, work long strokes
                                                                   across the width of the card. Add water to lighten the colour
                                                                   near the top of the card.
                                                                 •   Let the pigment dry naturally or use a heat gun to speed the
                                                                   process up between each colour layer.
                                                                 •   Add more colour in the same way but only a third of the way
                                                                   up the card at slightly di erent angles so there is no straight

                                                                   line across the card.
                                                                 •   Add the next colour, a slightly darker shade but this time not
                                                                   applying the strokes as high up as the last colour.
                                                                 •   Add pigment mixed with black to the bottom part of the
                                                                   card, dry and add more if needed to deepen the colour.


      54 www.makingcardsmagazine.com
   49   50   51   52   53   54   55   56   57   58   59