
Page 56 - Making Cards & Papercraft (February 2020)
P. 56
COLOURING TUTORIAL MC 15 03 ads_MC '13 09 26/01/2015 12:02 Page 73
Colour it clear!
Following on from Sue’s tutorial last issue showing how to colour glowing light,
this issue Sue shows how your alcohol markers can create the effect of clear glass!
Designed by
Sue Hastead
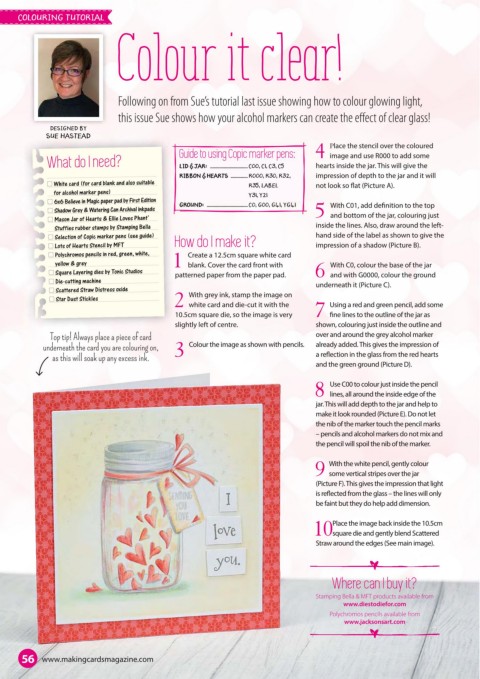
Place the stencil over the coloured
Guide to using Copic marker pens: 4 image and use R000 to add some
What do I need? Lid & jar: ................................. C00, C1, C3, C5 hearts inside the jar. This will give the
Lid & jar:
Ribbon & hearts ............... R000, R30, R32, impression of depth to the jar and it will
Ribbon & hearts
White card (for card blank and also suitable R35, Label not look so at (Picture A).
for alcohol marker pens) Y31, Y21
6x6 Believe in Magic paper pad by First Edition Ground: With C01, add de nition to the top
Ground: .................................... C0, G00, G41, YG41
Shadow Grey & Watering Can Archival inkpads
Mason Jar of Hearts & Ellie Loves Phant’ 5 and bottom of the jar, colouring just
Stuffies rubber stamps by Stamping Bella inside the lines. Also, draw around the left-
Selection of Copic marker pens (see guide) hand side of the label as shown to give the
Lots of Hearts Stencil by MFT How do I make it? impression of a shadow (Picture B).
Polychromos pencils in red, green, white, Create a 12.5cm square white card
yellow & grey 1 blank. Cover the card front with With C0, colour the base of the jar
Square Layering dies by Tonic Studios patterned paper from the paper pad. 6 and with G0000, colour the ground
Die-cutting machine underneath it (Picture C).
Scattered Straw Distress oxide With grey ink, stamp the image on
Star Dust Stickles
2 white card and die-cut it with the Using a red and green pencil, add some
10.5cm square die, so the image is very 7 ne lines to the outline of the jar as
slightly left of centre. shown, colouring just inside the outline and
Top tip! Always place a piece of card over and around the grey alcohol marker
underneath the card you are colouring on, 3 Colour the image as shown with pencils. already added. This gives the impression of Creations By Rod Craft Storage Units
as this will soak up any excess ink. a re ection in the glass from the red hearts www.creations-by-rod.co.uk Will also fit IKEA KALLAX/EXPEDIT & similar Cubes
and the green ground (Picture D).
Now in our 12 th year of designing, hand building and
supplying storage for crafters
Use C00 to colour just inside the pencil
Over 20 different units available for storing paper, pens,
8 lines, all around the inside edge of the pencils, markers, ribbons, cutting dies, punches, ink
pads, embroidery threads and general “stash”, etc!
jar. This will add depth to the jar and help to
Price from: £45.95 each (inc FREE postage UK mainland)
make it look rounded (Picture E). Do not let 10% discounts available for orders of 3 or more!
the nib of the marker touch the pencil marks Available to order now from my website
– pencils and alcohol markers do not mix and (www.creations-by-rod.co.uk).
Payments are handled via PayPal.
the pencil will spoil the nib of the marker.
Printable catalogue in .PDF format is available free to
download from my website.
With the white pencil, gently colour Creations By Rod, Dept MC, The Great Barn (Workshop)
Stede Hill, Harrietsham, Kent ME17 1NR
9 some vertical stripes over the jar
Handmade Storage Solutions for Crafters
(Picture F). This gives the impression that light
is re ected from the glass – the lines will only
be faint but they do help add dimension.
Place the image back inside the 10.5cm
10square die and gently blend Scattered
Straw around the edges (See main image).
Where can I buy it?
Stamping Bella & MFT products available from
www.diestodiefor.com
Polychromos pencils available from
www.jacksonsart.com
56 www.makingcardsmagazine.com