
Page 21 - ClayCraft - Issue 35 (January 2020)
P. 21
DIFFICULTY RATING ★★★★ ★
You will need:
■ Stoneware clay as used for the other sections
■ Half-globe/bowl moulds in varying sizes down
from the largest used to make one of the major sections
■ Rolling pin, plastic sheet, 1cm-thick roller guides 2
■ Small-headed loop tools for carving
■ Glazes of choice to fit clay type and complement
those used for other sections
Before you begin:
■ You will need to make a good selection of spacers in
the various sizes. It’s better to have too many than wish
you had just one or two more as you’re assembling the
totem.
■ If you don’t have, or don’t want to make, various
moulds like those used here, you could pinch these
sections following the method for joining pinched
sections, demonstrated in many issues of ClayCraft.
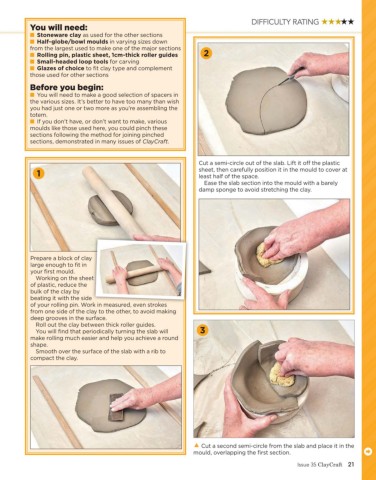
Cut a semi-circle out of the slab. Lift it o the plastic
sheet, then carefully position it in the mould to cover at
1 least half of the space.
Ease the slab section into the mould with a barely
damp sponge to avoid stretching the clay.
Prepare a block of clay
large enough to fit in
your first mould.
Working on the sheet
Working on the sheet
of plastic, reduce the
bulk of the clay by
beating it with the side
of your rolling pin. Work in measured, even strokes
of your rolling pin. Work in measured, even strokes
from one side of the clay to the other, to avoid making
deep grooves in the surface.
Roll out the clay between thick roller guides.
You will find that periodically turning the slab will 3
make rolling much easier and help you achieve a round
shape.
Smooth over the surface of the slab with a rib to
compact the clay.
Cut a second semi-circle from the slab and place it in the
mould, overlapping the first section. .
Issue 35 ClayCraft 21