
Page 24 - Tamiya Model Magazine - Issue 292 (February 2020)
P. 24
FULL-BUILD: WORLD WAR TWO ALLIED AVIATION
EDUARD 1:48 HAWKER TEMPEST MK.V SERIES II ● KIT NO.82122KIT NO.82122KIT NO.82122
V
and the Netherlands. The
aircraft was thus given
D-Day invasion bands under
the fuselage but also V1
kill-marks in front of the
cockpit.
The Brassin cockpit is,
to coin a phrase, a model
within the model; with
more than fifty-five parts
in resin and eighteen in
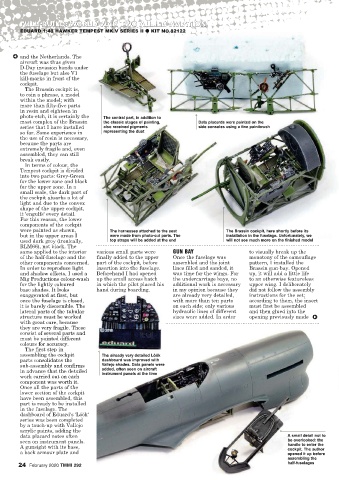
photo-etch, it is certainly the The central part, in addition to
most complex of the Brassin the classic stages of painting, Data placards were painted on the
series that I have installed also received pigments side consoles using a fine paintbrush
so far. Some experience in representing the dust
the use of resin is necessary,
because the parts are
extremely fragile and, even
assembled, they can still
break easily.
In terms of colour, the
Tempest cockpit is divided
into two parts: Grey-Green
for the lower zone and black
for the upper zone. In a
small scale, the dark part of
the cockpit absorbs a lot of
light and due to the convex
shape of the upper cockpit,
it 'engulfs' every detail.
For this reason, the lower
components of the cockpit
were painted as shown, The harnesses attached to the seat The Brassin cockpit, here shortly before its
but in the upper areas I were made from photo-cut parts. The installation in the fuselage. Unfortunately, we
used dark grey (ironically, top straps will be added at the end will not see much more on the finished model
RLM66), not black. The
same applied to the interior various small parts were GUN BAY to visually break up the
of the half-fuselage and the finally added to the upper Once the fuselage was monotony of the camouflage
other components concerned. part of the cockpit, before assembled and the joint pattern, I installed the
In order to reproduce light
In order to reproduce light insertion into the fuselage. lines filled and sanded, it Brassin gun-bay. Opened
and shadow effects, I used a
and shadow effects, I used a Beforehand I had opened was time for the wings. For up, it will add a little life
Mig Productions colour-wash
Mig Productions colour-wash up the small access hatch the undercarriage bays, no to an otherwise featureless
for the lightly coloured
for the lightly coloured in which the pilot placed his additional work is necessary upper wing. I deliberately
base shades. It looks
base shades. It looks hand during boarding. in my opinion because they did not follow the assembly
exaggerated at first, but
exaggerated at first, but are already very detailed, instructions for the set;
once the fuselage is closed,
once the fuselage is closed, with more than ten parts according to them, the insert
it is barely discernible. The
it is barely discernible. The on each side; only various must first be assembled
lateral parts of the tubular
lateral parts of the tubular hydraulic lines of different and then glued into the
structure must be worked
structure must be worked sizes were added. In order opening previously made U
with great care, because
with great care, because
they are very fragile. These
they are very fragile. These
consist of several parts and
consist of several parts and
must be painted different
must be painted different
colours for accuracy.
colours for accuracy.
The first step in
The first step in
assembling the cockpit The already very detailed Löök
assembling the cockpit
parts consolidates the
parts consolidates the dashboard was improved with
sub-assembly and confirms
sub-assembly and confirms Vallejo shades. Data panels were
in advance that the detailed
in advance that the detailed added, often seen on aircraft
instrument panels at the time
work carried out on each
work carried out on each
component was worth it.
component was worth it.
Once all the parts of the
Once all the parts of the
lower section of the cockpit
have been assembled, this
part is ready to be installed
in the fuselage. The
dashboard of Eduard's 'Löök'
series was been completed
by a touch-up with Vallejo
acrylic paints, adding the
data placard notes often A small detail not to
seen on instrument panels. be overlooked: the
handle to enter the
A gunsight with its base, cockpit. The author
a back armour plate and opened it up before
assembling the
half-fuselages
24 February 2020 TMMI 292