
Page 133 - The City and Guilds Textbook: Plumbing Book 1 for the Level 3 Apprenticeship (9189), Level 2 Technical Certificate (8202) and Level 2 Diploma (6035)
P. 133
Chapter 2 Common processes and techniques
3 Using a nail punch, punch the nails below the surface of the board.
4 Set the depth on the circular saw just less than the depth of the board. This
is to ensure that any cables or services already installed are not damaged.
5 Run down the length of the boards to be lifted with the circular saw to cut
the tongue of the board.
6 Now, using the marks previously made, carefully cut across the board using
the circular saw.
7 The board can now be lifted using a bolster chisel to prise it up.
8 When replacing the board, the edges need to be supported by wooden cleats.
This can be done as shown in Figure 2.40.
Noggins supporting the free edge of the opening
p Figure 2.40 Step 8
Notching and drilling joists KEY POINT
Many installations require the notching and drilling of timber joists to The strength and
accommodate tubes and fittings under the floor. If these operations are not the stiffness of the
carried out correctly, it could result in a weakening of the joist and, in some joist must not be
extreme cases, structural damage to the property. compromised.
Holes or notches that are made too close together, holes drilled too near the
end of a joist, and holes or notches incorrectly positioned too near to the centre
of the joist span can weaken joists to the point where they become useless as
structural supports.
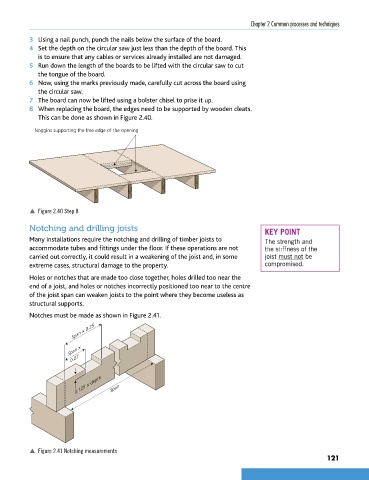
Notches must be made as shown in Figure 2.41.
Span × 0.25
Span ×
0.07
0.125 × depth Span
p Figure 2.41 Notching measurements
121
9781510416482.indb 121 29/03/19 8:54 PM