
Page 619 - The City and Guilds Textbook: Plumbing Book 1 for the Level 3 Apprenticeship (9189), Level 2 Technical Certificate (8202) and Level 2 Diploma (6035)
P. 619
Chapter 9 Sanitation systems
Soundness testing, step by step
Before testing begins, make a visual inspection of the system to ensure that
it conforms to the British Standards, that you are happy with the clipping
distances and that all joints appear to be made correctly.
Testing should be completed in accordance with BS 12056–2.
1 First, seal the pipework at the top and the bottom by using either drain plugs
or drain testing bags. The bottom drain plug can be inserted through the INDUSTRY TIP
access cover at the base of the stack. If the system is installed in a
2 Fill all the traps on the system by letting a little water down each appliance multi-storey property, it may
and a little water down the WC to cover the bottom plug. This will ensure need to be tested in stages or
the plug’s airtightness. floor by floor.
3 On the top plug, a rubber tube is fastened. The tube needs to have a tee
piece inserted. On one side of the tee is a hand pump and an air inlet valve,
on the other side a manometer (water gauge) is installed. The manometer is
measured in mm.
4 The hand pump is pumped until a measurement of 38 mm is reached and the
air inlet valve is turned off; 38 mm is the maximum pressure that should be
pumped into the system as the WC has only 50 mm of water in the trap and
any pressure higher than this will breach the trap. The 38 mm test pressure
must remain constant for a minimum of three minutes.
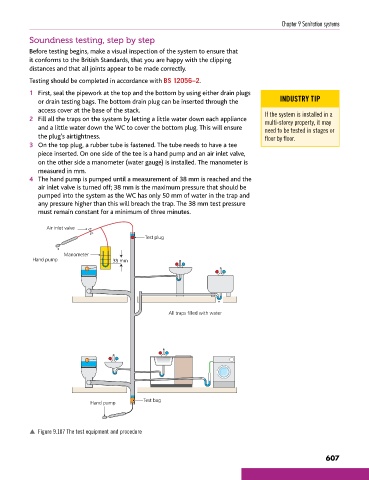
Air inlet valve
Test plug
Manometer
Hand pump 38 mm
All traps filled with water
Test bag
Hand pump
p Figure 9.107 The test equipment and procedure
607
9781510416482.indb 607 29/03/19 9:08 PM