
Page 65 - Learn To Program With Scratch
P. 65
Always pay special attention when using the create clone of block
in a script that doesn’t start with the green flag trigger, or you could end
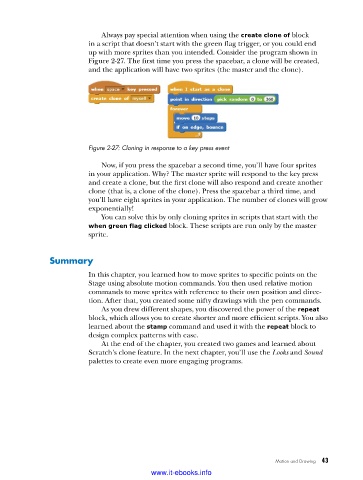
up with more sprites than you intended. Consider the program shown in
Figure 2-27. The first time you press the spacebar, a clone will be created,
and the application will have two sprites (the master and the clone).
Figure 2-27: Cloning in response to a key press event
Now, if you press the spacebar a second time, you’ll have four sprites
in your application. Why? The master sprite will respond to the key press
and create a clone, but the first clone will also respond and create another
clone (that is, a clone of the clone). Press the spacebar a third time, and
you’ll have eight sprites in your application. The number of clones will grow
exponentially!
You can solve this by only cloning sprites in scripts that start with the
when green flag clicked block. These scripts are run only by the master
sprite.
Summary
In this chapter, you learned how to move sprites to specific points on the
Stage using absolute motion commands. You then used relative motion
commands to move sprites with reference to their own position and direc-
tion. After that, you created some nifty drawings with the pen commands.
As you drew different shapes, you discovered the power of the repeat
block, which allows you to create shorter and more efficient scripts. You also
learned about the stamp command and used it with the repeat block to
design complex patterns with ease.
At the end of the chapter, you created two games and learned about
Scratch’s clone feature. In the next chapter, you’ll use the Looks and Sound
palettes to create even more engaging programs.
Motion and Drawing 43
www.it-ebooks.info