
Page 29 - X-Air User's Manual
P. 29
29 X AIR User Manual
Preferences Tab The snapshots recall parameters are listed in 3 categories: channel, parameter
and global.
The Channel Section lets you determine which channels or bus masters will be
affected during recall.
The Parameter Section lets you determine which specific preamp elements will
be recalled for the channels and buses selected in the Channel Section above.
Source affects the input vs. USB selection, Input recalls basic preamp settings
such as phantom and gain setting, and Config recalls the configuration. EQ, Dyn,
Fdr/Pan and Mute recall these settings for the selected channels, and the bus/FX
sends can be individually assigned for recall.
Global Settings allow the input/output routing to be recalled, as well as global
configuration, DCA assignments, and FX block settings.
Select the ‘Apply changes to all channels’ option if you would like changes made
to bus send taps (pre/post-EQ, etc) to be applied to all channels. To delete a snapshot that is no longer necessary, select it from the list and
click Delete.
Auto Select options allow the last soloed channel to be selected automatically,
and allow a channel to be automatically selected whenever its fader is adjusted. 7.13 Utilities
Exclusive solo mode allows only one source to be soloed at a time. Pressing a Utilities offer convenient editing and customization of items that are not easily
channel’s Solo button will automatically un-solo previously soloed channels.
controlled on other windows or menus.
The ‘Fine’ fader mode allows adjustments to the faders to occur more gradually,
allowing more precise control when making small changes. RTA Utility
The update rate defaults to 100%, meaning the meters and RTA display
immediate feedback of the audio signals. However, this can be adjusted to 50%,
which shows less detail but also conserves on processing power.
The configuration of the application’s windows can be stored and recalled upon
launch. Click the Initialize button to clear the stored window configuration.
Use the Always on Top selection to keep certain windows in view regardless of
other windows being adjusted.
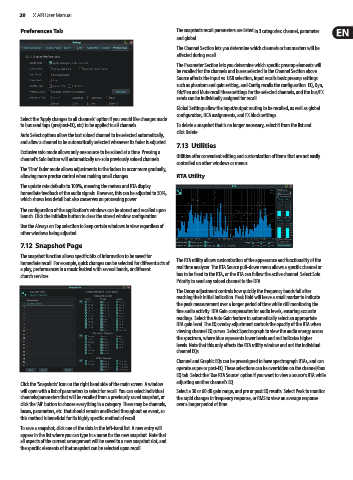
7.12 Snapshot Page
The snapshot function allows specific bits of information to be saved for The RTA utility allows customization of the appearance and functionality of the
immediate recall. For example, quick changes can be selected for different acts of real time analyzer. The RTA Source pull-down menu allows a specific channel or
a play, performances in a music festival with several bands, or different
church services. bus to be fixed to the RTA, or the RTA can follow the active channel. Select Solo
Priority to send any soloed channel to the RTA.
The Decay adjustment controls how quickly the frequency bands fall after
reaching their initial indication. Peak Hold will leave a small marker to indicate
the peak measurement over a longer period of time while still monitoring the
fine audio activity. RTA Gain compensates for audio levels, ensuring accurate
readings. Select the Auto Gain feature to automatically select an appropriate
RTA gain level. The EQ overlay adjustment controls the opacity of the RTA when
viewing channel EQ curves. Select Spectrograph to view the audio energy across
the spectrum, where blue represents lower levels and red indicates higher
levels. Note that this only affects the RTA utility window and not the individual
channel EQs.
Channel and Graphic EQs can be preassigned to have spectrograph RTAs, and can
operate as pre or post-EQ. These selections can be overridden on the channel/bus
EQ tab. Select the ‘Use RTA Source’ option if you want to view a source’s RTA while
adjusting another channel's EQ.
Click the ‘Snapshots’ icon on the right hand side of the main screen. A window
will open with a list of parameters to select for recall. You can select individual Select a 30 or 60 dB gain range, and pre or post EQ results. Select Peak to monitor
channels/parameters that will be recalled from a previously saved snapshot, or the rapid changes in frequency response, or RMS to view an average response
click the ‘All’ button to choose everything in a category. There may be channels, over a longer period of time.
buses, parameters, etc. that should remain unaffected throughout an event, so
this method is beneficial for its highly specific method of recall.
To save a snapshot, click one of the slots in the left-hand list. A new entry will
appear in the list where you can type in a name for the new snapshot. Note that
all aspects of the current arrangement will be saved to a new snapshot slot, and
the specific elements of that snapshot can be selected upon recall.