
Page 670 - The City and Guilds Textbook: Plumbing Book 1 for the Level 3 Apprenticeship (9189), Level 2 Technical Certificate (8202) and Level 2 Diploma (6035)
P. 670
The City & Guilds Textbook: Plumbing Book 1
Wiring a three-pin plug
1 First you will need to strip off about 4–5 cm of the outer cable sleeve. Slit
the outer sleeve of the cable lengthways using an electrical knife or flexible
cable stripping tool, being careful not to cut into the coloured wires or
yourself. Peel the outer sleeve away and cut it off using cable cutters or wire
cutters.
2 Separate the wires and cut them to the correct length using wire cutters.
Measure the length they need to be against the plug, matching them up to
the correct terminal points.
3 To remove the insulation you will need wire strippers or wire cutters. Be
careful not to cut into the individual strands of wire and only cut off about
5 mm of the insulation. Once you have done this you then need to twist the
ends of the wire so you have a hard cable to work with, rather than individual
strands.
4 Now you need to connect each wire to the correct terminal. To start you
need to slacken the screw on top of the terminal and push the bare wire
into the hole created. The correct tool to use for this type of terminal is an
electrician’s screwdriver. All electricians’ tools are designed and fitted with
p Figure 11.24 Wiring a three-pin insulation to protect the user from an electric shock. You then need to re-
plug tighten the screw down on to the bare cable and terminal body. Make sure
the terminals are tight and that there are no bare wires or loose strands
of wire showing or overhanging the terminal, as a loose wire could cause a
short circuit.
The terminals are normally stamped with the following letters:
● L = line (brown)
● N = neutral (blue)
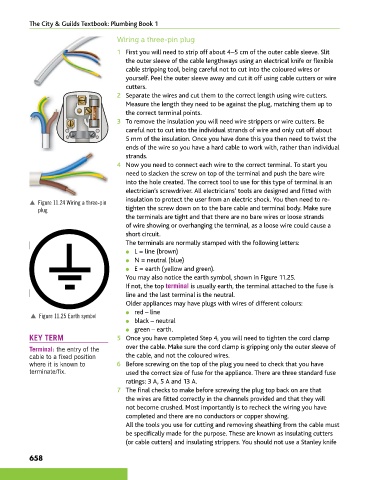
● E = earth (yellow and green).
You may also notice the earth symbol, shown in Figure 11.25.
If not, the top terminal is usually earth, the terminal attached to the fuse is
line and the last terminal is the neutral.
Older appliances may have plugs with wires of different colours:
● red – line
p Figure 11.25 Earth symbol
● black – neutral
● green – earth.
KEY TERM 5 Once you have completed Step 4, you will need to tighten the cord clamp
Terminal: the entry of the over the cable. Make sure the cord clamp is gripping only the outer sleeve of
cable to a fixed position the cable, and not the coloured wires.
where it is known to 6 Before screwing on the top of the plug you need to check that you have
terminate/fix. used the correct size of fuse for the appliance. There are three standard fuse
ratings: 3 A, 5 A and 13 A.
7 The final checks to make before screwing the plug top back on are that
the wires are fitted correctly in the channels provided and that they will
not become crushed. Most importantly is to recheck the wiring you have
completed and there are no conductors or copper showing.
All the tools you use for cutting and removing sheathing from the cable must
be specifically made for the purpose. These are known as insulating cutters
(or cable cutters) and insulating strippers. You should not use a Stanley knife
658
9781510416482.indb 658 29/03/19 9:09 PM