
Page 13 - Computing Book 5
P. 13
Working with Media Class 5
Open Project:
Click on Open Project to choose from the projects (.wfp files) saved on your computer.
New Project:
Select an aspect ratio from the dropdown and then click on New Project to enter the editing
interface and begin a new project.
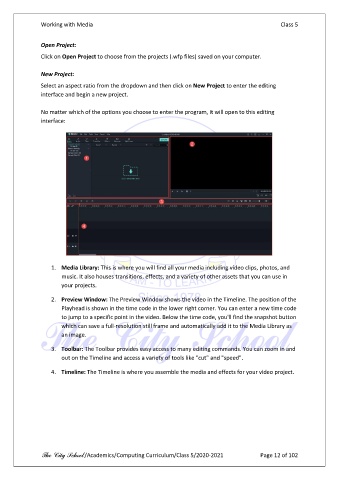
No matter which of the options you choose to enter the program, it will open to this editing
interface:
1. Media Library: This is where you will find all your media including video clips, photos, and
music. It also houses transitions, effects, and a variety of other assets that you can use in
your projects.
2. Preview Window: The Preview Window shows the video in the Timeline. The position of the
Playhead is shown in the time code in the lower right corner. You can enter a new time code
to jump to a specific point in the video. Below the time code, you'll find the snapshot button
which can save a full-resolution still frame and automatically add it to the Media Library as
an image.
3. Toolbar: The Toolbar provides easy access to many editing commands. You can zoom in and
out on the Timeline and access a variety of tools like "cut" and "speed".
4. Timeline: The Timeline is where you assemble the media and effects for your video project.
The City School /Academics/Computing Curriculum/Class 5/2020-2021 Page 12 of 102