
Page 10 - QC-Smart_ PSS- Manual_webb ENG_Neat
P. 10
Adjust - This will open a new window with four sliders which allow you to adjust the
Brightness, Contrast, Color Saturation and Hue of that channel’s video. These settings will not
affect the recorded video.
Audio/Talk - If you have audio-equipped cameras, or a microphone co-located with a
camera, you can listen to the audio from that equipment. Similarly, if you have a microphone 1
connected to your computer and a speaker located near to the camera’s location, you can
use that to communicate. The system is not “duplex” like a telephone where you can talk and
hear at the same time, but rather it is like a CB radio or walky-talky where you will need to turn
off your microphone to hear any response. Depending upon network speeds, there may be a
lag, or delay between the time you say something and the person on the other end will here it. 2
Save as Video Task - You can save a camera as a “Video Task” that will create a shortcut
to that camera which can be accessed through the Tasks pulldown at the lower left of the 3
Preview window (Item 6 in Picture 3-70).
4
Full Screen - This will bring the camera viewing windows to full screen by hiding the control
areas on the top, right and bottom. If you are viewing in a four-camera split screen, for
example, the four screens will occupy the available space on the computer monitor. Press 5 6 7 8
Esc on the keyboard to return to normal viewing mode.
9
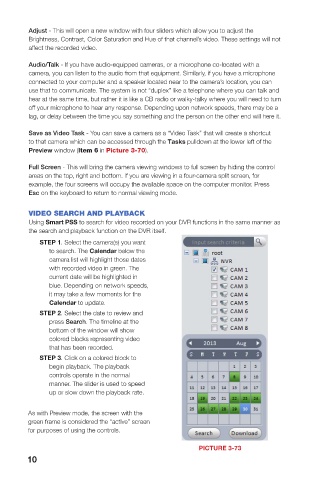
VIDEO SEARCH AND PLAYBACK
Using Smart PSS to search for video recorded on your DVR functions in the same manner as
the search and playback function on the DVR itself. PICTURE 3-74
STEP 1. Select the camera(s) you want 1 Device List Choose which camera(s) you wish to search
to search. The Calendar below the 2 Snapshot/ Lists recorded files. Files can be downloaded to your computer
camera list will highlight those dates Record Bar
with recorded video in green. The Take snapshot (saved to computer’s hard drive)
current date will be highlighted in Closes channel
blue. Depending on network speeds, 3 Calendar Shows which days have video records
it may take a few moments for the 4 Download Opens list of videos saved to computer’s hard drive
Calendar to update. Manager
STEP 2. Select the date to review and 5 Playback Controls playback function in selected screen.
press Search. The timeline at the Controls Starts playback of other channels with video recorded at the
bottom of the window will show same time.
colored blocks representing video
that has been recorded. 6 Volume Control Requires an microphone to be connected to that channel
STEP 3. Click on a colored block to 7 Multi-Screen Slider adjusts between single-screen view and 36-screen view with
begin playback. The playback Mode 10 configurations possible.
controls operate in the normal 8 Screen Aspect Change the aspect ratio (height vs. width) of the on-screen view.
manner. The slider is used to speed Ratio/Full Screen Click to bring window to full screen. Pressing ESC will return to
up or slow down the playback rate. normal window view.
9 Timeline Shows videos recorded on that date.
As with Preview mode, the screen with the Arrows to right of camera name filter results based on method of
green frame is considered the “active” screen recording.
for purposes of using the controls.
Magnifying slider adjusts scale of timeline for precise selection of
video
PICTURE 3-73
10 11