
Page 6 - QC-Smart_ PSS- Manual_webb ENG_Neat
P. 6
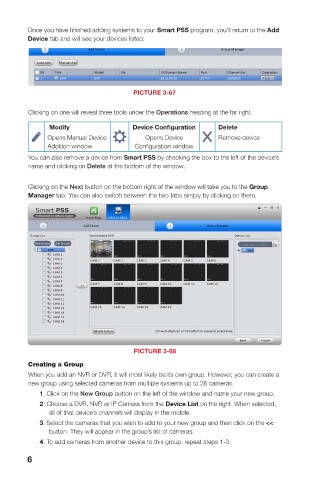
Once you have finished adding systems to your Smart PSS program, you’ll return to the Add   HOME PAGE
        Device tab and will see your devices listed.                                    All of Smart PSS’ functions are accessed through its main window which is referred to as the
                                                                                        Home Page. The functions are divided into three areas; Basic, Extension and Setting.


                                   PICTURE 3-67

        Clicking on one will reveal three tools under the Operations heading at the far right.

              Modify               Device Configuration  Delete
             Opens Manual Device      Opens Device       Remove device
             Addition window       Configuration window
        You can also remove a device from Smart PSS by checking the box to the left of the device’s
        name and clicking on Delete at the bottom of the window.

        Clicking on the Next button on the bottom right of the window will take you to the Group
        Manager tab. You can also switch between the two tabs simply by clicking on them.


                                                                                                                  PICTURE 3-69
                                                                                        The first area, Basic, is where you’ll find the live viewing, search and playback, and alarm
                                                                                        events functions which are the most commonly used. Extensions contains features and
                                                                                        operations not found on your system and Setting allows you to make changes to your DVR or
                                                                                        NVR as if you were at the machine. Clicking any one of the icons will open up a new window
                                                                                        within Smart PSS. You will be able to move between windows by clicking on its icon at the
                                                                                        top of the window. Hovering the mouse over the icon will reveal an X which can be clicked
                                                                                        upon to close that window. Only the Home Page window cannot be exited in that manner.


                                   PICTURE 3-68

        Creating a Group
        When you add an NVR or DVR, it will most likely be its own group. However, you can create a
        new group using selected cameras from multiple systems up to 36 cameras.
           1. Click on the New Group button on the left of the window and name your new group.
           2. Choose a DVR, NVR or IP Camera from the Device List on the right. When selected,
              all of that device’s channels will display in the middle.
           3. Select the cameras that you wish to add to your new group and then click on the <<
              button. They will appear in the group’s list of cameras.
           4. To add cameras from another device to this group, repeat steps 1-3.
        6                                                                                                                                              7