
Page 16 - X-Air User's Manual
P. 16
16 X AIR User Manual
5. X AIR for iPad 11. The Fader Bank buttons alter the function of the channel faders. When set
to Main, the faders adjust the channel volume levels sent to the main
The X AIR applications for iOS, Android and Mac/Win/Linux allow all of the bus, and the overall main output. When one of the Aux or Effect buttons
physical controls and features normally found on analog mixers to be adjusted are selected, the faders adjust each channel’s send level to that bus for
digitally, and also allow effects and routing to be fully adjusted, all from a remote
location away from the input box. This results in a very compact, yet full-featured monitoring or effects routing. The level for the Aux or Effect bus that is
currently selected can be adjusted where the main fader normally appears.
mixing solution that can be operated while moving about the venue or studio.
This chapter will discuss the software's functionality on an iPad. 5.2 Input
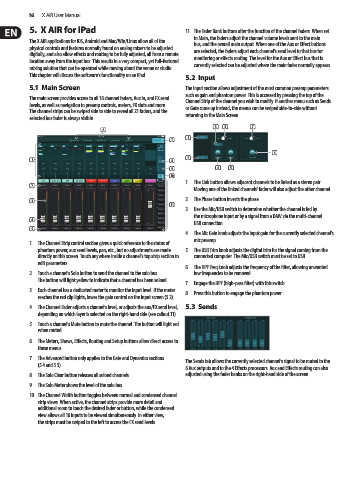
5.1 Main Screen The Input section allows adjustment of the most common preamp parameters
such as gain and phantom power. This is accessed by pressing the top of the
The main screen provides access to all 16 channel faders, Aux in, and FX send Channel Strip of the channel you wish to modify. If another menu such as Sends
levels, as well as navigation to preamp controls, meters, FX slots and more.
The channel strips can be swiped side to side to reveal all 21 faders, and the or Gate come up instead, the menus can be swiped side-to-side without
returning to the Main Screen.
selected bus fader is always visible.
(8) (3) (7)
(6)
(1)
(7)
(6)
(1) (8) (2)
(9) (4) (5)
(10)
1. The Link button allows adjacent channels to be linked as a stereo pair.
(2)
Moving one of the linked channels‘ fader will also adjust the other channel.
(3) 2. The Phase button inverts the phase.
(11)
3. Use the Mic/USB switch to determine whether the channel is fed by
the microphone input or by a signal from a DAW via the multi-channel
(4) USB connection.
(5)
4. The Mic Gain knob adjusts the input gain for the currently selected channel’s
mic preamp.
1. The Channel Strip control section gives a quick reference to the status of
phantom power, aux send levels, pan, etc., but no adjustments are made 5. The USB Trim knob adjusts the digital trim for the signal coming from the
directly on this screen. Touch anywhere inside a channel’s top strip section to connected computer. The Mic/USB switch must be set to USB.
edit parameters.
6. The HPF Freq knob adjusts the frequency of the filter, allowing unwanted
2. Touch a channel’s Solo button to send the channel to the solo bus. low frequencies to be removed.
The button will light yellow to indicate that a channel has been soloed.
7. Engage the HPF (high-pass filter) with this switch.
3. Each channel has a dedicated meter to monitor the input level. If the meter
reaches the red clip lights, lower the gain control on the Input screen (5.2). 8. Press this button to engage the phantom power.
4. The Channel Fader adjusts a channel’s level, or adjusts the aux/FX send level, 5.3 Sends
depending on which layer is selected on the right-hand side (see callout 11).
5. Touch a channel’s Mute button to mute the channel. The button will light red
when muted.
6. The Meters, Shows, Effects, Routing and Setup buttons allow direct access to
these menus.
7. The Advanced button only applies to the Gate and Dynamics sections The Sends tab allows the currently selected channel’s signal to be routed to the
(5.4 and 5.5).
6 Aux outputs and to the 4 Effects processors. Aux and Effects routing can also
8. The Solo Clear button releases all soloed channels. adjusted using the fader banks on the right-hand side of the screen.
9. The Solo Meter shows the level of the solo bus.
10. The Channel Width button toggles between normal and condensed channel
strip views. When active, the channel strips provide more detail and
additional room to touch the desired fader or button, while the condensed
view allows all 16 inputs to be viewed simultaneously. In either view,
the strips must be swiped to the left to access the FX send levels.