
Page 20 - X-Air User's Manual
P. 20
20 X AIR User Manual
6. X AIR for Android 10. Access the Aux and FX return faders with this button.
The X AIR applications for iOS, Android and Mac/Win/Linux allow all of the 11. Activate the Sends on Faders function with this button. When active,
physical controls and features normally found on analog mixers to be adjusted the faders control the bus send levels for the currently active bus
digitally, and also allow effects and routing to be fully adjusted, all from a remote (see callout 13). Moving between the channel and Aux/FX layers allows the
location away from the input box. This results in a very compact, yet full-featured sends for those layers to be adjusted as well.
mixing solution that can be operated while moving about the venue or studio. 12. Access the bus master faders with this button. Note that these will not be
This chapter will discuss the software’s functionality on an Android device.
visible when the Sends on Faders function is active.
6.1 Main View 13. When using the Sends on Faders function, the bus to which the channel
signals are sent is selected with the button directly below the Sends on
The Main View screen provides access to all 16 channel faders, Aux in, and FX and Faders button. Pressing the Bus Master button will allow the send level for
bus levels, as well as navigation to preamp controls, meters, FX slots and more.
the selected bus to be adjusted.
(6) 14. Access the FX Send and Main LR faders with this button.
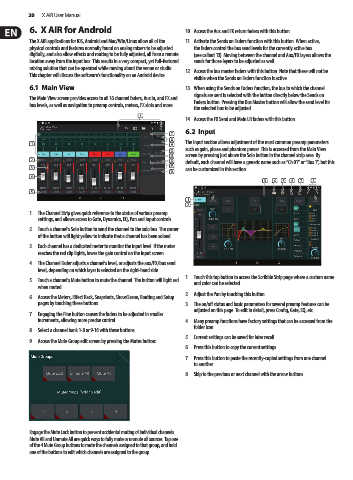
6.2 Input
(7)
(8) The Input section allows adjustment of the most common preamp parameters
(1) (9)
(10) such as gain, phase and phantom power. This is accessed from the Main View
(11) screen by pressing just above the Solo button in the channel strip area. By
(2) (12) default, each channel will have a generic name such as “Ch 01” or “Bus 1”, but this
(3) (13) can be customized in this section.
(14)
(4)
(3) (4) (5) (6) (7) (8)
(5)
(1)
(2)
1. The Channel Strip gives quick reference to the status of various preamp
settings, and allows access to Gate, Dynamics, EQ, Pan and Input controls.
2. Touch a channel’s Solo button to send the channel to the solo bus. The corner
of the button will light yellow to indicate that a channel has been soloed.
3. Each channel has a dedicated meter to monitor the input level. If the meter
reaches the red clip lights, lower the gain control on the Input screen.
4. The Channel Fader adjusts a channel’s level, or adjusts the aux/FX/bus send
level, depending on which layer is selected on the right-hand side.
1. Touch this top button to access the Scribble Strip page where a custom name
5. Touch a channel’s Mute button to mute the channel. The button will light red
when muted. and color can be selected.
2. Adjust the Pan by touching this button.
6. Access the Meters, Effect Rack, Snapshots, Show/Scene, Routing and Setup
pages by touching these buttons. 3. The on/off status and basic parameters for several preamp features can be
adjusted on this page. To edit in detail, press Config, Gate, EQ, etc.
7. Engaging the Fine button causes the faders to be adjusted in smaller
increments, allowing more precise control. 4. Many preamp functions have factory settings that can be accessed from the
folder icon.
8. Select a channel bank 1-8 or 9-16 with these buttons.
5. Current settings can be saved for later recall.
9. Access the Mute Group edit screen by pressing the Mutes button:
6. Press this button to copy the current settings.
7. Press this button to paste the recently-copied settings from one channel
to another.
8. Skip to the previous or next channel with the arrow buttons.
Engage the Mute Lock button to prevent accidental muting of individual channels.
Mute All and Unmute All are quick ways to fully mute or unmute all sources. Tap one
of the 4 Mute Group buttons to mute the channels assigned to that group, and hold
one of the buttons to edit which channels are assigned to the group.