
Page 481 - The City and Guilds Textbook: Plumbing Book 1 for the Level 3 Apprenticeship (9189), Level 2 Technical Certificate (8202) and Level 2 Diploma (6035)
P. 481
Chapter 7 Central heating systems
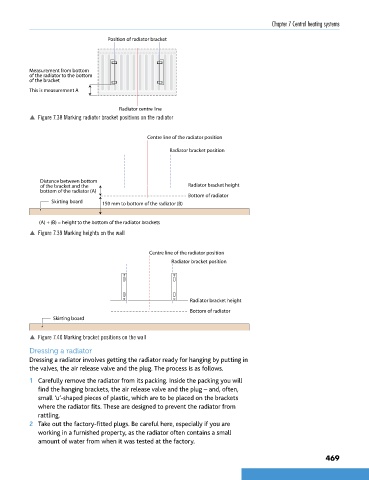
Position of radiator bracket
Measurement from bottom
of the radiator to the bottom
of the bracket
This is measurement A
Radiator centre line
p Figure 7.38 Marking radiator bracket positions on the radiator
Centre line of the radiator position
Radiator bracket position
Distance between bottom
of the bracket and the Radiator bracket height
bottom of the radiator (A)
Bottom of radiator
Skirting board 150 mm to bottom of the radiator (B)
(A) + (B) = height to the bottom of the radiator brackets
p Figure 7.39 Marking heights on the wall
Centre line of the radiator position
Radiator bracket position
Radiator bracket height
Bottom of radiator
Skirting board
p Figure 7.40 Marking bracket positions on the wall
Dressing a radiator
Dressing a radiator involves getting the radiator ready for hanging by putting in
the valves, the air release valve and the plug. The process is as follows.
1 Carefully remove the radiator from its packing. Inside the packing you will
find the hanging brackets, the air release valve and the plug – and, often,
small ‘u’-shaped pieces of plastic, which are to be placed on the brackets
where the radiator fits. These are designed to prevent the radiator from
rattling.
2 Take out the factory-fitted plugs. Be careful here, especially if you are
working in a furnished property, as the radiator often contains a small
amount of water from when it was tested at the factory.
469
9781510416482.indb 469 29/03/19 9:03 PM