
Page 76 - Computing book 6
P. 76
Handling Databases – MS Access Class 6
• Click on that button to launch the Form Wizard
• On this first screen in the wizard, you can select
fields that you want to display on your form,
and you can choose from fields from more than
one table or a query.
• Let us assume we want to simply have a quick
form that we are going to use for data entry for
our employee information.
• From the Tables/Queries drop-down list, select
tblEmployees table. Click on the double arrow
to move all the fields at once and click next.
• After clicking next, the Form Wizard will ask for the
layout that we would like for our form. We have
the columnar, tabular, datasheet and justified
layouts. We will choose the columnar layout here
and then click Next.
• On the next window, we need to give a title to
our form i.e. EmployeeForm.
• Once you have given your form a title, there
will be two more options below by which you
can open the form to see what that form looks
like, or you can begin entering information into
your table.
• Or you can choose the option to modify the
form's design.
• Choose the first option to open the form to
view or enter information and click Finish.
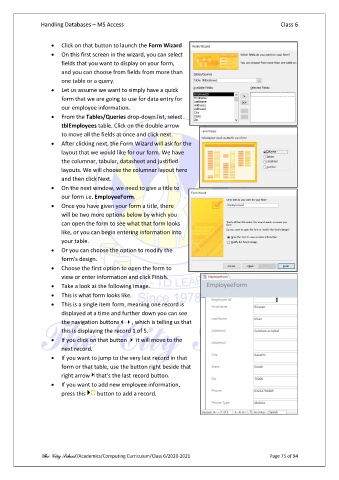
• Take a look at the following image.
• This is what form looks like.
• This is a single item form, meaning one record is
displayed at a time and further down you can see
the navigation buttons, which is telling us that
this is displaying the record 1 of 5.
• If you click on that button it will move to the
next record.
• If you want to jump to the very last record in that
form or that table, use the button right beside that
right arrow that's the last record button.
• If you want to add new employee information,
press this button to add a record.
The City School /Academics/Computing Curriculum/Class 6/2020-2021 Page 75 of 94