
Page 74 - Computing book 6
P. 74
Handling Databases – MS Access Class 6
7. Here, on the left-hand side of each record, you will see a little plus sign by default. When you
create a relationship, Access will automatically add a sub-datasheet to that table.
8. Similarly, open and enter the HR details of
these employees in tblHRData.
9. Open and click on the plus sign and you will
see the information that is related to this
record is on the tblEmployee table.
10. This data is visible on this table due to the
relationship of mutual field of Employee ID on
both tblEmployee and tblHRData tables.
Create Simple and Complex Queries:
Database tables can hold a lot of records, in some cases, millions or billions of them, therefore, if you
want to find a piece of information, you have to filter the records and select which ones you want to
display. To do that, you have to create a query. A query is a special “question” you apply to the
database to find specific data and get the information you want. For this task, let’s continue working
with the Employee table we have used before.
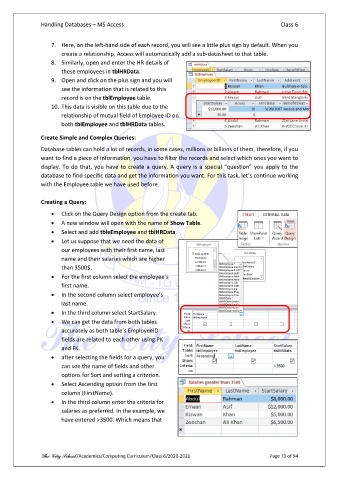
Creating a Query:
• Click on the Query Design option from the create tab.
• A new window will open with the name of Show Table.
• Select and add tbleEmployee and tblHRData.
• Let us suppose that we need the data of
our employees with their first name, last
name and their salaries which are higher
than 3500$.
• For the first column select the employee’s
first name.
• In the second column select employee’s
last name.
• In the third column select StartSalary.
• We can get the data from both tables
accurately as both table’s EmployeeID
fields are related to each other using PK
and FK.
• after selecting the fields for a query, you
can see the name of fields and other
options for Sort and setting a criterion.
• Select Ascending option from the first
column (FirstName).
• In the third column enter the criteria for
salaries as preferred. In the example, we
have entered >3500. Which means that
The City School /Academics/Computing Curriculum/Class 6/2020-2021 Page 73 of 94