
Page 26 - Learn To Program With Scratch
P. 26
You should see a single window with at least the following three panes:
the Stage (top left), the Sprite List (bottom left), and the Scripts tab (right),
which contains the Blocks tab and the Scripts Area. The right pane also con-
tains two additional tabs, Costumes and Sounds, which will be discussed later
in this section. If you’re logged into an account on the Scratch website, you
should also see the Backpack (bottom right), which has buttons that let you
share your project and use sprites and scripts from existing projects.
Let’s take a quick look at the three main panes.
The Stage
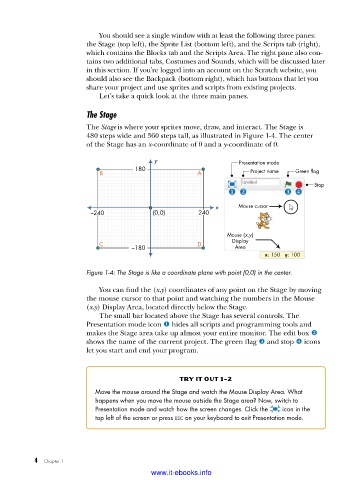
The Stage is where your sprites move, draw, and interact. The Stage is
480 steps wide and 360 steps tall, as illustrated in Figure 1-4. The center
of the Stage has an x-coordinate of 0 and a y-coordinate of 0.
y Presentation mode
180
B A Project name Green flag
Stop
x Mouse cursor
–240 (0,0) 240
Mouse ( x,y )
C D Display
–180 Area
x: 150 y: 100
Figure 1-4: The Stage is like a coordinate plane with point (0,0) in the center .
You can find the (x,y) coordinates of any point on the Stage by moving
the mouse cursor to that point and watching the numbers in the Mouse
(x,y) Display Area, located directly below the Stage.
The small bar located above the Stage has several controls. The
Presentation mode icon u hides all scripts and programming tools and
makes the Stage area take up almost your entire monitor. The edit box v
shows the name of the current project. The green flag w and stop x icons
let you start and end your program.
try it out 1-2
Move the mouse around the Stage and watch the Mouse Display Area . What
happens when you move the mouse outside the Stage area? Now, switch to
Presentation mode and watch how the screen changes . Click the icon in the
top left of the screen or press esc on your keyboard to exit Presentation mode .
4 Chapter 1
www.it-ebooks.info