
Page 27 - Learn To Program With Scratch
P. 27
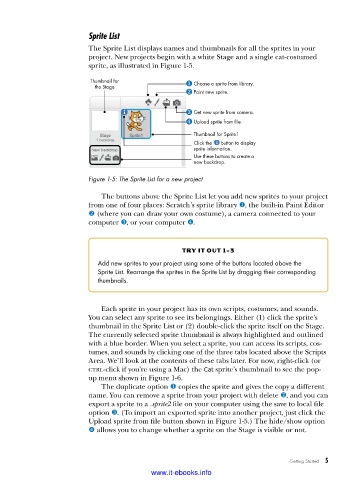
Sprite List
The Sprite List displays names and thumbnails for all the sprites in your
project. New projects begin with a white Stage and a single cat-costumed
sprite, as illustrated in Figure 1-5.
Thumbnail for Choose a sprite from library.
the Stage
Paint new sprite.
Get new sprite from camera.
Upload sprite from file.
Thumbnail for Sprite1
Click the button to display
sprite information.
Use these buttons to create a
new backdrop.
Figure 1-5: The Sprite List for a new project
The buttons above the Sprite List let you add new sprites to your project
from one of four places: Scratch’s sprite library u, the built-in Paint Editor
v (where you can draw your own costume), a camera connected to your
computer w, or your computer x.
try it out 1-3
Add new sprites to your project using some of the buttons located above the
Sprite List . Rearrange the sprites in the Sprite List by dragging their corresponding
thumbnails .
Each sprite in your project has its own scripts, costumes, and sounds.
You can select any sprite to see its belongings. Either (1) click the sprite’s
thumbnail in the Sprite List or (2) double-click the sprite itself on the Stage.
The currently selected sprite thumbnail is always highlighted and outlined
with a blue border. When you select a sprite, you can access its scripts, cos-
tumes, and sounds by clicking one of the three tabs located above the Scripts
Area. We’ll look at the contents of these tabs later. For now, right-click (or
ctrl-click if you’re using a Mac) the Cat sprite’s thumbnail to see the pop-
up menu shown in Figure 1-6.
The duplicate option u copies the sprite and gives the copy a different
name. You can remove a sprite from your project with delete v, and you can
export a sprite to a .sprite2 file on your computer using the save to local file
option w. (To import an exported sprite into another project, just click the
Upload sprite from file button shown in Figure 1-5.) The hide/show option
x allows you to change whether a sprite on the Stage is visible or not.
Getting Started 5
www.it-ebooks.info