
Page 9 - MercNET User's Guide
P. 9
3. Continue entering additional item numbers and quantities
• • Fill Details – Displays the unit of measure (UOM) and item name
• • Delete – Removes all selected items from the list before adding it to the cart
• • View Comments – Allows you to enter comments for each line item (will display on packing slip).
Comments entered are for customer use only.
• • Add More Rows – Adds 10 more rows to the order
• • Upload (See Upload DMS Order or EPC Pick List (page 14) to upload orders from an inventory
management program or to upload Mercury EPC pick lists into an order.
4. Select Add to Cart
Note: Items must be selected to be added to cart.
• • Messages regarding items that need to be reviewed will be displayed at the top of the screen. Review
the item messages and select Add to Cart to continue.
Note: Only Active Items can be added to the shopping cart.
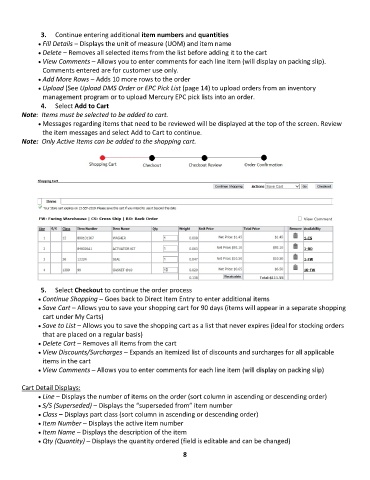
5. Select Checkout to continue the order process
• • Continue Shopping – Goes back to Direct Item Entry to enter additional items
• • Save Cart – Allows you to save your shopping cart for 90 days (items will appear in a separate shopping
cart under My Carts)
• • Save to List – Allows you to save the shopping cart as a list that never expires (ideal for stocking orders
that are placed on a regular basis)
• • Delete Cart – Removes all items from the cart
• • View Discounts/Surcharges – Expands an itemized list of discounts and surcharges for all applicable
items in the cart
• • View Comments – Allows you to enter comments for each line item (will display on packing slip)
Cart Detail Displays:
• • Line – Displays the number of items on the order (sort column in ascending or descending order)
• • S/S (Superseded) – Displays the “superseded from” item number
• • Class – Displays part class (sort column in ascending or descending order)
• • Item Number – Displays the active item number
• • Item Name – Displays the description of the item
• • Qty (Quantity) – Displays the quantity ordered (field is editable and can be changed)
8