
Page 132 - Installation Manual - GenII DTS
P. 132
Accessories
Start/Stop Switch Installation
! WARNING
Performing service or maintenance without first disconnecting the battery can cause product damage, personal injury, or
death due to fire, explosion, electrical shock, or unexpected engine starting. Always disconnect the battery cables from the
battery before maintaining, servicing, installing, or removing engine or drive components.
! CAUTION
Avoid injury or product damage. Obstructions, such as braces and wiring, may be unseen when looking at the front of the
dashboard. Before drilling or cutting any holes in the dashboard, check the area behind the dashboard for obstructions. Do
not drill or cut when obstructions are present.
1. Disconnect both battery cables.
2. Select an appropriate dashboard location for the start/stop switch.
3. Drill a 54 mm (2‑1/8 in.) mounting hole using a hole saw.
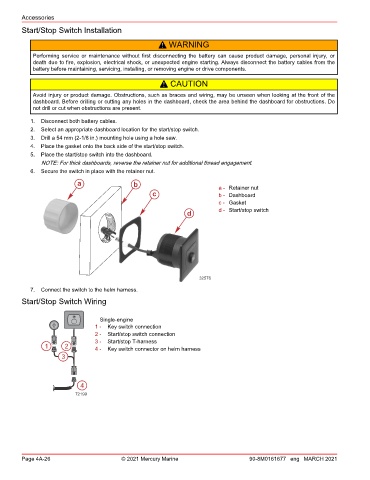
4. Place the gasket onto the back side of the start/stop switch.
5. Place the start/stop switch into the dashboard.
NOTE: For thick dashboards, reverse the retainer nut for additional thread engagement.
6. Secure the switch in place with the retainer nut.
a b a - Retainer nut
c b - Dashboard
c - Gasket
d d - Start/stop switch
32576
7. Connect the switch to the helm harness.
Start/Stop Switch Wiring
Single-engine
1 - Key switch connection
2 - Start/stop switch connection
3 - Start/stop T‑harness
1 2 4 - Key switch connector on helm harness
3
4
72199
Page 4A-26 © 2021 Mercury Marine 90-8M0161677 eng MARCH 2021