
Page 57 - Computing Book 4
P. 57
Collecting Information – MS Access Class 4
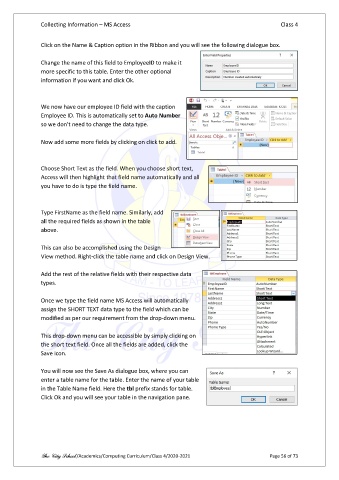
Click on the Name & Caption option in the Ribbon and you will see the following dialogue box.
Change the name of this field to EmployeeID to make it
more specific to this table. Enter the other optional
information if you want and click Ok.
We now have our employee ID field with the caption
Employee ID. This is automatically set to Auto Number
so we don't need to change the data type.
Now add some more fields by clicking on click to add.
Choose Short Text as the field. When you choose short text,
Access will then highlight that field name automatically and all
you have to do is type the field name.
Type FirstName as the field name. Similarly, add
all the required fields as shown in the table
above.
This can also be accomplished using the Design
View method. Right-click the table name and click on Design View.
Add the rest of the relative fields with their respective data
types.
Once we type the field name MS Access will automatically
assign the SHORT TEXT data type to the field which can be
modified as per our requirement from the drop-down menu.
This drop-down menu can be accessible by simply clicking on
the short text field. Once all the fields are added, click the
Save icon.
You will now see the Save As dialogue box, where you can
enter a table name for the table. Enter the name of your table
in the Table Name field. Here the tbl prefix stands for table.
Click Ok and you will see your table in the navigation pane.
The City School /Academics/Computing Curriculum/Class 4/2020-2021 Page 56 of 73