
Page 22 - X-Air User's Manual
P. 22
22 X AIR User Manual
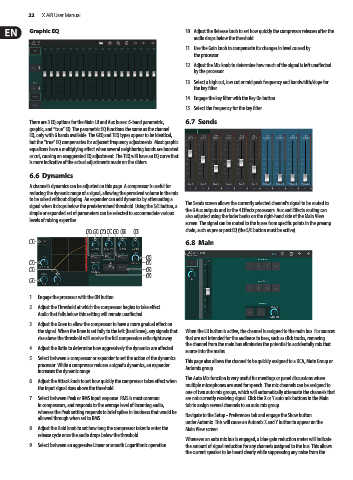
Graphic EQ 10. Adjust the Release knob to set how quickly the compressor releases after the
audio drops below the threshold.
11. Use the Gain knob to compensate for changes in level caused by
the processor.
12. Adjust the Mix knob to determine how much of the signal is left unaffected
by the processor.
13. Select a high cut, low cut or mid peak frequency and bandwidth/slope for
the key filter.
14. Engage the key filter with the Key On button.
15. Select the frequency for the key filter.
There are 3 EQ options for the Main LR and Aux buses: 6-band parametric, 6.7 Sends
graphic, and “true” EQ. The parametric EQ functions the same as the channel
EQ, only with 6 bands available. The GEQ and TEQ types appear to be identical,
but the “true” EQ compensates for adjacent frequency adjustments. Most graphic
equalizers have a multiplying effect when several neighboring bands are boosted
or cut, causing an exaggerated EQ adjustment. The TEQ will have an EQ curve that
is more indicative of the actual adjustments made on the sliders.
6.6 Dynamics
A channel’s dynamics can be adjusted on this page. A compressor is useful for
reducing the dynamic range of a signal, allowing the perceived volume in the mix
to be raised without clipping. An expander can add dynamics by attenuating a The Sends screen allows the currently selected channel’s signal to be routed to
signal when it drops below the predetermined threshold. Using the S/E button, a
simple or expanded set of parameters can be selected to accommodate various the 6 Aux outputs and to the 4 Effects processors. Aux and Effects routing can
also adjusted using the fader banks on the right-hand side of the Main View
levels of mixing expertise.
screen. The signal can be routed to the buses from specific points in the preamp
(5) (6) (7) (8) (9) (10) (11) chain, such as pre or post EQ (the S/E button must be active).
(1) 6.8 Main
(12)
(2) (13)
(3) (14)
(15)
(4)
1. Engage the processor with the ON button.
2. Adjust the Threshold at which the compressor begins to take effect.
Audio that falls below this setting will remain unaffected.
3. Adjust the Knee to allow the compressor to have a more gradual effect on
the signal. When the Knee is set fully to the left (hard knee), any signals that When the LR button is active, the channel is assigned to the main bus. For sources
rise above the threshold will receive the full compression ratio right away. that are not intended for the audience to hear, such as click tracks, removing
the channel from the main bus eliminates the potential to accidentally mix that
4. Adjust the Ratio to determine how aggressively the dynamics are affected.
source into the mains.
5. Select between a compressor or expander to set the action of the dynamics This page also allows the channel to be quickly assigned to a DCA, Mute Group or
processor. While a compressor reduces a signal’s dynamics, an expander Automix group.
increases the dynamic range.
The Auto Mix function is very useful for meetings or panel discussions where
6. Adjust the Attack knob to set how quickly the compressor takes effect when
the input signal rises above the threshold. multiple microphones are used for speech. The mic channels can be assigned to
one of two auto mix groups, which will automatically attenuate the channels that
7. Select between Peak or RMS input response. RMS is most common are not currently receiving signal. Click the X or Y auto mix buttons in the Main
in compressors, and responds to the average level of incoming audio, tab to assign several channels to an auto mix group.
whereas the Peak setting responds to brief spikes in loudness that would be
allowed through when set to RMS. Navigate to the Setup - Preferences tab and engage the Show button
under Automix. This will cause an Automix X and Y button to appear on the
8. Adjust the Hold knob to set how long the compressor takes to enter the Main View screen.
release cycle once the audio drops below the threshold.
Whenever an auto mix bus is engaged, a blue gain reduction meter will indicate
9. Select between an aggressive Linear or smooth Logarithmic operation. the amount of signal reduction for any channels assigned to the bus. This allows
the current speaker to be heard clearly while suppressing any noise from the