
Page 336 - Fluid Fitting 2018_extended
P. 336
HIGH QUALITY PRODUCTS EXCELLENCE IN SERVICE
ASSEMBLY INSTRUCTIONS
STANDARD TWO EDGE CUTTING RING CONT.
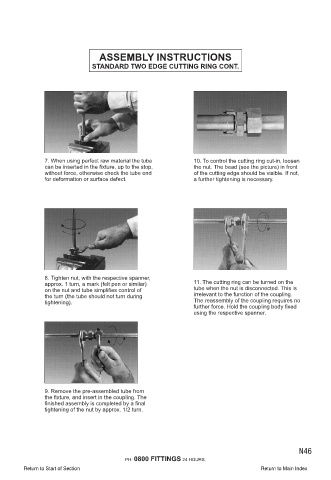
7. When using perfect raw material the tube 10. To control the cutting ring cut-in, loosen
can be inserted in the fixture, up to the stop, the nut. The bead (see the picture) in front
without force, otherwise check the tube end of the cutting edge should be visible. If not,
for deformation or surface defect. a further tightening is necessary.
8. Tighten nut, with the respective spanner,
approx. 1 turn, a mark (felt pen or similar) 11. The cutting ring can be turned on the
on the nut and tube simplifies control of tube when the nut is disconnected. This is
the turn (the tube should not turn during irrelevant to the function of the coupling.
tightening). The reassembly of the coupling requires no
further force. Hold the coupling body fixed
using the respective spanner.
9. Remove the pre-assembled tube from
the fixture, and insert in the coupling. The
finished assembly is completed by a final
tightening of the nut by approx. 1/2 turn.
PH: 0800 FITTINGS 24 HOURS. N46
vii
PH: 0800 FITTINGS 24 HOURS.
Return to Start of Section Return to Main Index