
Page 119 - Learn To Program With Scratch
P. 119
Creating and Using Variables
DiceSimulator_ In this section, we’ll explore how to create and use variables through a
NoCode .sb2 simple application that simulates rolling a pair of dice and displays their
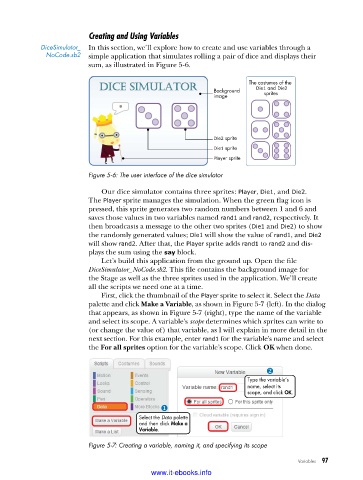
sum, as illustrated in Figure 5-6.
The costumes of the
Background Die1 and Die2
image sprites
Die2 sprite
Die1 sprite
Player sprite
Figure 5-6: The user interface of the dice simulator
Our dice simulator contains three sprites: Player, Die1, and Die2.
The Player sprite manages the simulation. When the green flag icon is
pressed, this sprite generates two random numbers between 1 and 6 and
saves those values in two variables named rand1 and rand2, respectively. It
then broadcasts a message to the other two sprites (Die1 and Die2) to show
the randomly generated values; Die1 will show the value of rand1, and Die2
will show rand2. After that, the Player sprite adds rand1 to rand2 and dis-
plays the sum using the say block.
Let’s build this application from the ground up. Open the file
DiceSimulator_NoCode.sb2. This file contains the background image for
the Stage as well as the three sprites used in the application. We’ll create
all the scripts we need one at a time.
First, click the thumbnail of the Player sprite to select it. Select the Data
palette and click Make a Variable, as shown in Figure 5-7 (left). In the dialog
that appears, as shown in Figure 5-7 (right), type the name of the variable
and select its scope. A variable’s scope determines which sprites can write to
(or change the value of) that variable, as I will explain in more detail in the
next section. For this example, enter rand1 for the variable’s name and select
the For all sprites option for the variable’s scope. Click OK when done.
Type the variable’s
name, select its
scope, and click OK.
Select the Data palette
and then click Make a
Variable.
Figure 5-7: Creating a variable, naming it, and specifying its scope
Variables 97
www.it-ebooks.info