
Page 39 - Learn To Program With Scratch
P. 39
name the file Pong.sb2, and click Save. If you are currently signed in, you
can also save your work on the cloud (that is, on a Scratch server). Whether
you decide to save your files locally (on your computer) or on the cloud,
make sure to save your work often.
With the Paddle and Ball sprites, the Stage should look similar to
Figure 1-18. If you encounter any difficulties at this time, you can open
the file Pong_NoCode.sb2, which contains everything we just created. You’ll
add the scripts to run the game next, but don’t worry too much about the
details of the blocks. We’ll explore all of them later in the book, so for now,
let’s focus on learning to put a complete project together.
Step 3: Start the Game and Get Your Sprites Moving
As the designer for this game, you’ll decide how players can start a new
round. For example, the game could begin when you press a key, click a
sprite on the Stage, or even clap or wave your hands (if you have a webcam).
The green flag icon (located above the Stage) is another popular option,
which we’ll use here.
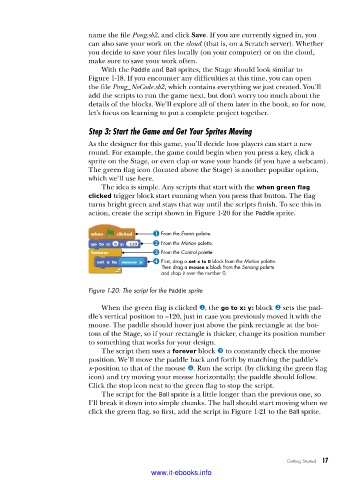
The idea is simple. Any scripts that start with the when green flag
clicked trigger block start running when you press that button. The flag
turns bright green and stays that way until the scripts finish. To see this in
action, create the script shown in Figure 1-20 for the Paddle sprite.
From the Events palette.
From the Motion palette.
From the Control palette.
First, drag a set x to 0 block from the Motion palette.
Then drag a mouse x block from the Sensing palette
and drop it over the number 0.
Figure 1-20: The script for the Paddle sprite
When the green flag is clicked u, the go to x: y: block v sets the pad-
dle’s vertical position to –120, just in case you previously moved it with the
mouse. The paddle should hover just above the pink rectangle at the bot-
tom of the Stage, so if your rectangle is thicker, change its position number
to something that works for your design.
The script then uses a forever block w to constantly check the mouse
position. We’ll move the paddle back and forth by matching the paddle’s
x-position to that of the mouse x. Run the script (by clicking the green flag
icon) and try moving your mouse horizontally; the paddle should follow.
Click the stop icon next to the green flag to stop the script.
The script for the Ball sprite is a little longer than the previous one, so
I’ll break it down into simple chunks. The ball should start moving when we
click the green flag, so first, add the script in Figure 1-21 to the Ball sprite.
Getting Started 17
www.it-ebooks.info